Payment Gateway Integration Guide
1. Purpose
The purpose of this document is to provide integration providers with documentation that will allow them to successfully integrate into the Digital Transactional Toolkit payment gateway. The DTT Payment Gateway provides an interface over a number of different payment providers making it much easier for third party suppliers engaged by NICs to integrate into those payment providers. The gateway currently supports the GOV.UK payment provider and the WorldPay payment provider. The following sections will detail the steps involved to successfully accepting online payments through either of these providers.
1.1 Pre-requisites
Before any integration can begin the business unit will have to engage with the appropriate payment provider to onboard to their service. This document assumes that these steps have been completed and all information is available to allow the reader to implement the integration steps described in this document.
1.2 Payment Platform URLs
The table below provides the details of the URLs for the Digital Transactional Toolkit (DTT) and the GOV Notify SMS service.
| Platform | URL |
|---|---|
| GOV UK | https://www.payments.service.gov.uk/ |
| World Pay Hosted Integration | https://developerengine.fisglobal.com/apis/wpg/hostedintegration |
| World Pay Secure Portal | https://secure.worldpay.com/sso/public/auth/login.html |
2. World Pay Setup
The following section describes the configuration required to set up the World Pay payment provider on the Digital Transaction Toolkit (DTT) payment gateway service.
2.1 World Pay Portal
In order to set up the Payment Gateway service on the Digital Transactional Toolkit we need to take information from the world pay payment portal. The following section describes the information that needs to be configured and which data is required for the DTT setup.
2.1.1 Authorization
When an account is set up on the World Pay Portal the user will be given an XML user and password to use for integration . These details are required to authorize API requests and also needs to be configured in the Payment Gateway DTT configuration screen as described in Section 3.1 of this document. The screenshot below displays where these details are set up on the world pay portal:
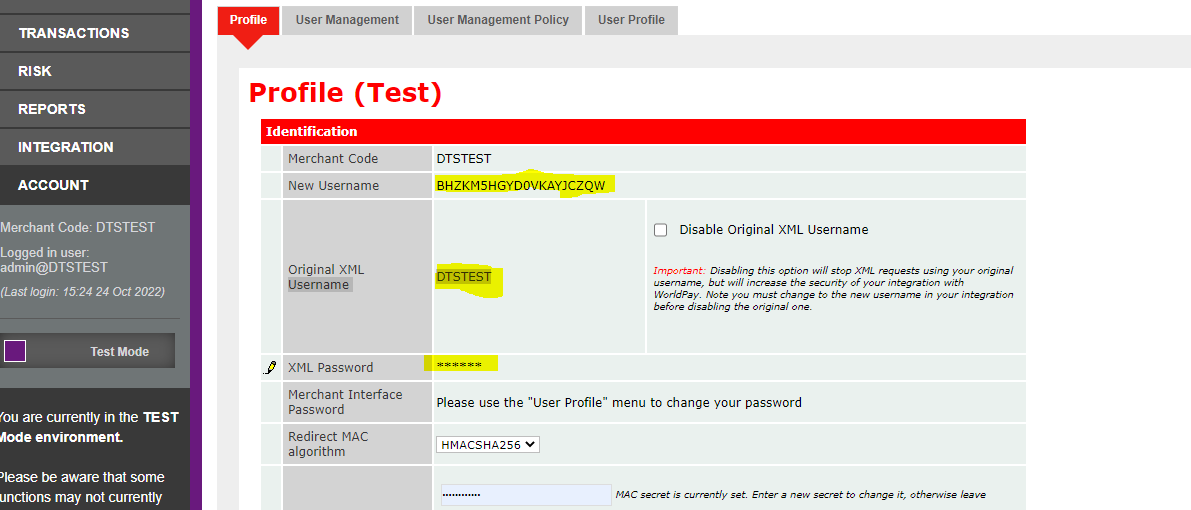
It is possible to use either of the usernames that are stored – original or new as highlighted in the screen shot above.
2.2 World Pay Configuration Data
The table below details the information the needs to be set up in the World Pay portal and also set up on the DTT Payment Gateway service.
| Value | Description | Sample Value |
|---|---|---|
| Merchant Code | This is the code that World Pay will provide when they set up the Merchant Account | DTSTEST |
| Installation ID | This is the identifier associated with the portal that is configuered for a new World Pay corporate portal | 1429050 |
| Hash Secret | This is a secret up in the World Pay portal so responses from the World Pay payment service can be validated. | fA0c15fb9a8f436ebc$d479e3 |
2.2.1 Merchant Code and Hash Secret
The screenshot below highlights the location on the World Pay portal where the Merchant and Hash Secret can be found.
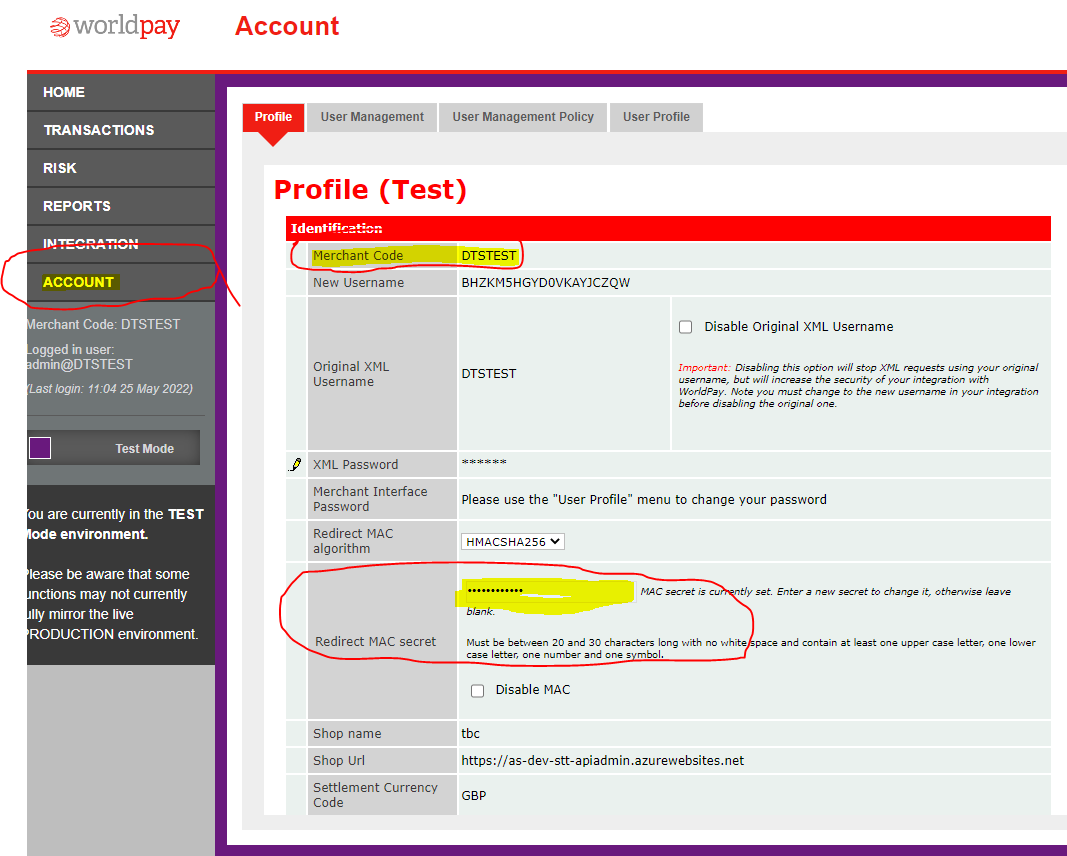 The Hash Secret is configured by the user whereas the Merchant Code is allocated by World Pay.
The User profile can only be changed in production mode.
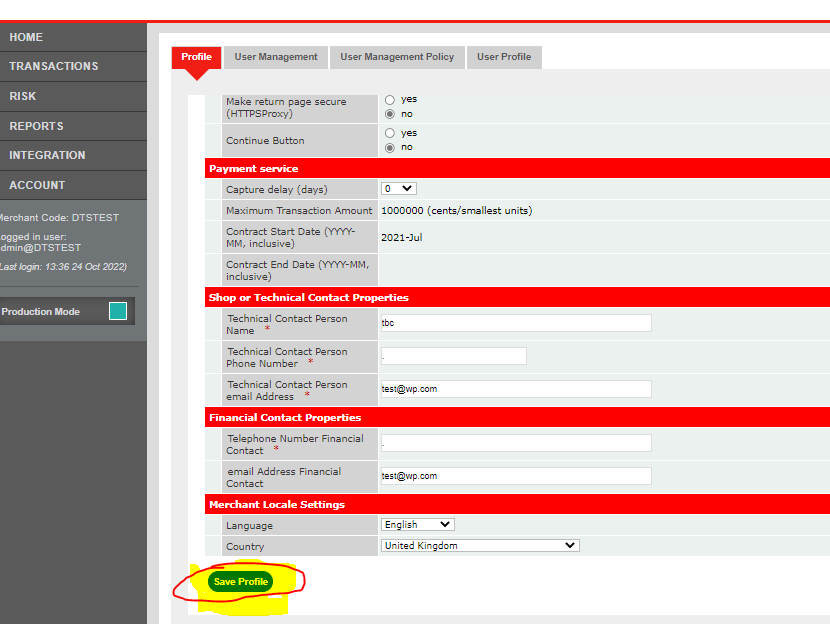
When a new merchant account is created the MAC secret will not be set up. In order to set the MAC secret the user needs to perform the following steps:
Switch from Test Mode to Production Mode.
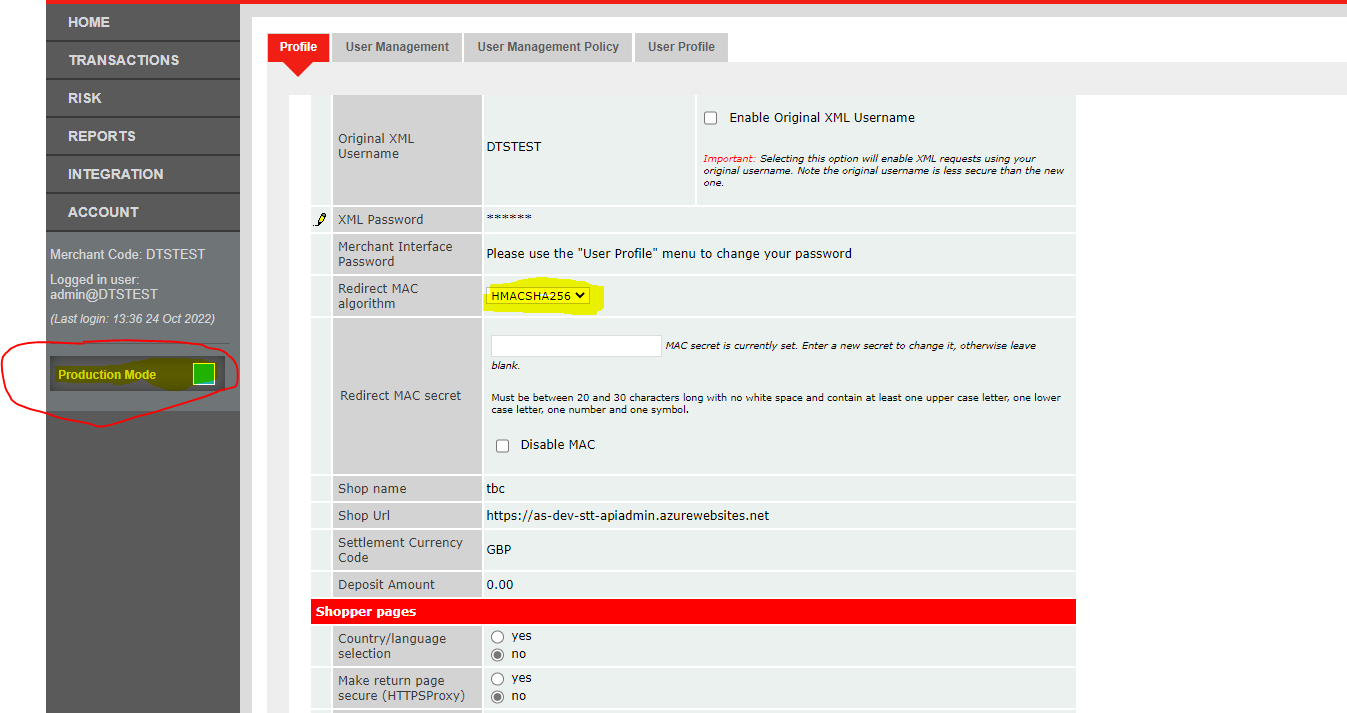
In production mode as above change the MAC algorithmn to HMACSHA256 and enter a new MAC secret. Once they have been changed then Save the profile by clicking the button as displayed in the screen shot below:
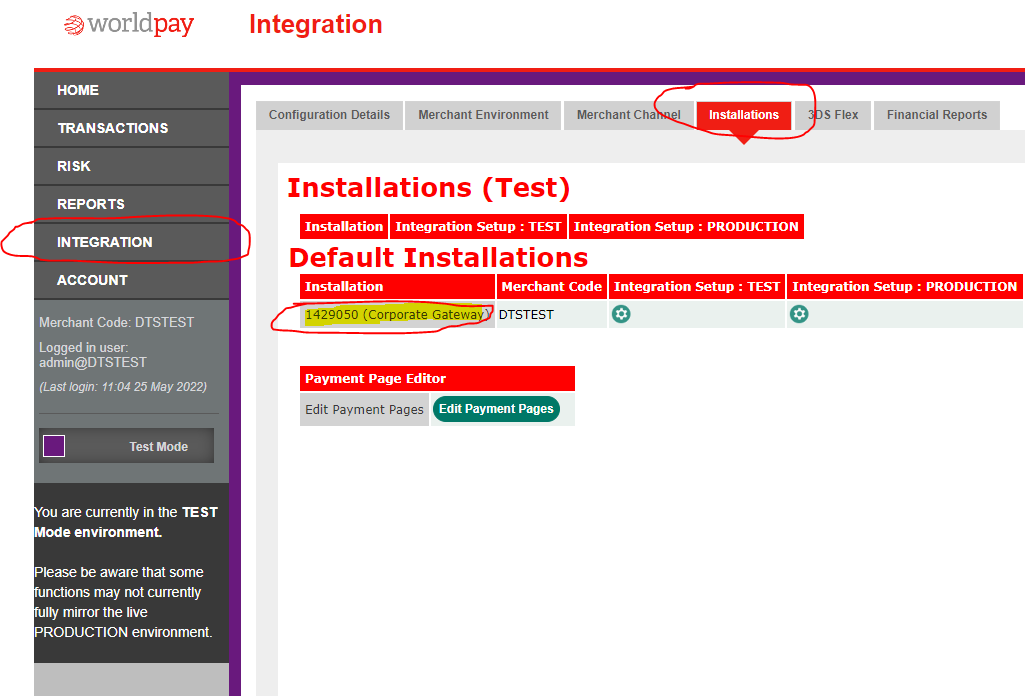
2.3 Installation ID
The screenshot below illustrates the location of the installation ID on the World Pay Corporate Gateway.
2.4 IP Address Setup
World Pay implements a physical security layer that restricts IP addresses that can call the payment gateway service. The screen shot below illustrates where this can be configured:
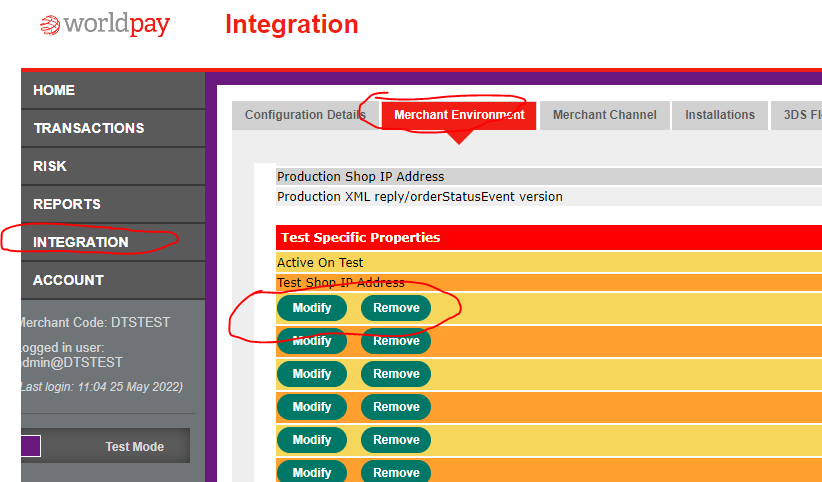
There are a number of IP addresses that need to be configured in the portal and these will be provided by the DSS Team during the setup. Once the above information has been configured on the world pay corporate gateway the rest of the payment configuration can be completed on the DTT platform as described in the following section.
3. GOV.UK Pay Setup
The following section describes the configuration required to set up the Gov.UK Pay payment provider on the Digital Transaction Toolkit (DTT) payment gateway service.
3.1 GOV.UK Payment Portal
In order to set up GOV.UK on the Payment Gateway service it is necessary to take information from the GOV.UK payment portal. The following section describes the information that needs to be configured and which data is required for setup.
3.2 GOV.UK Configuration Data
In order to set up GOV.UK on the Payment Gateway service it is necessary to take information from the GOV.UK payment portal. The following section describes the Data that is required for the setup.
| Value | Description | Sample Value |
|---|---|---|
| API Key | This is the API key generated on the GOVUK Pay portal | api_test_5n15cad7g1m9efkirfsg6u518sdjsdku3tpoflao6oub018dmfcanqhvie |
3.2.1 API Key
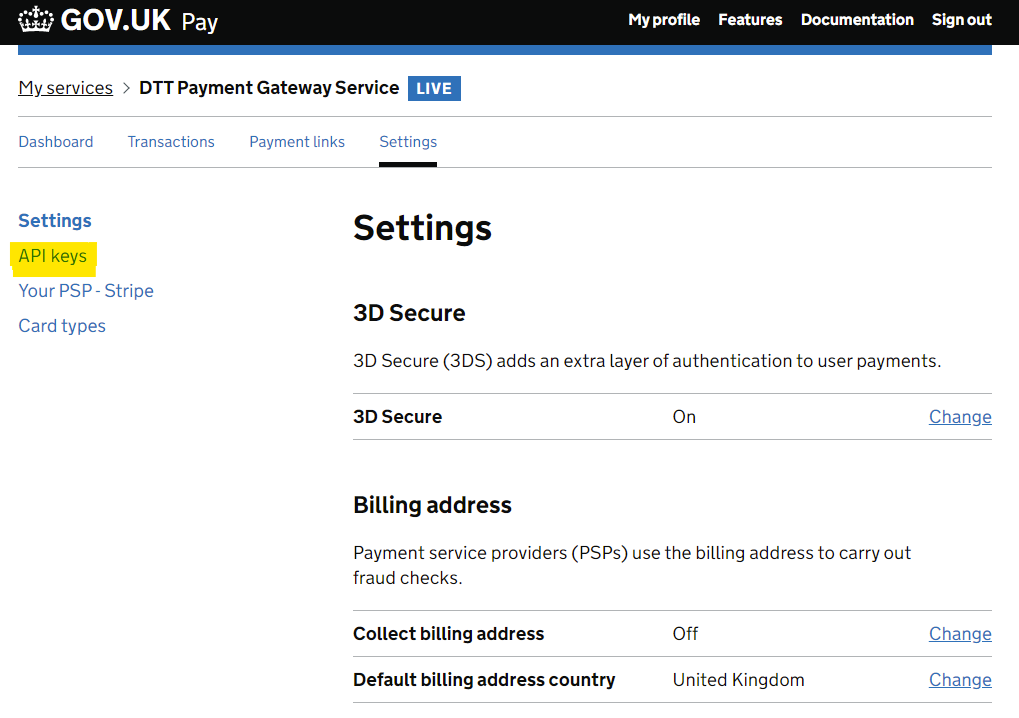
The screen shot below highlights the location on the Gov.UK payment portal where the Api Key is generated. After logging in to the Gov.Uk payment portal the user will be presented with their Dashboard screen as displayed in the screen below:

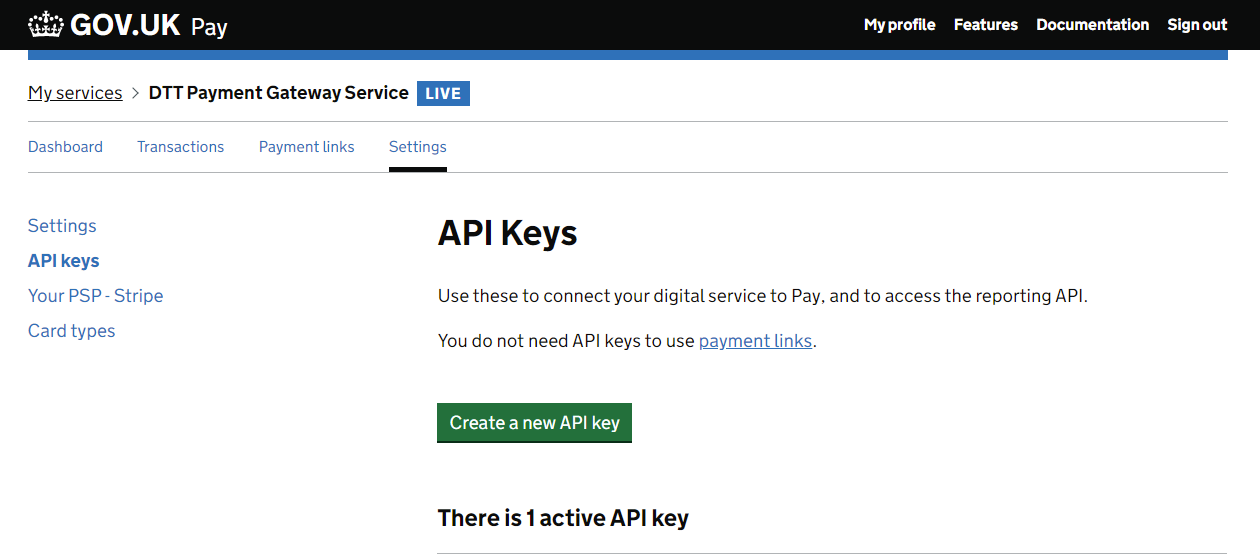
The user will select the settings option on the dashboard screen as highlighted in Figure 4 above. This will then take the user to the screen highlighted below , where they can click on the API keys option as highlighted below.
The user will be taken to the screen shown below, where they can generate a new API key.
After the user has clicked the Generate API Key button they will follow the instructions which will lead to a screen displayed below:
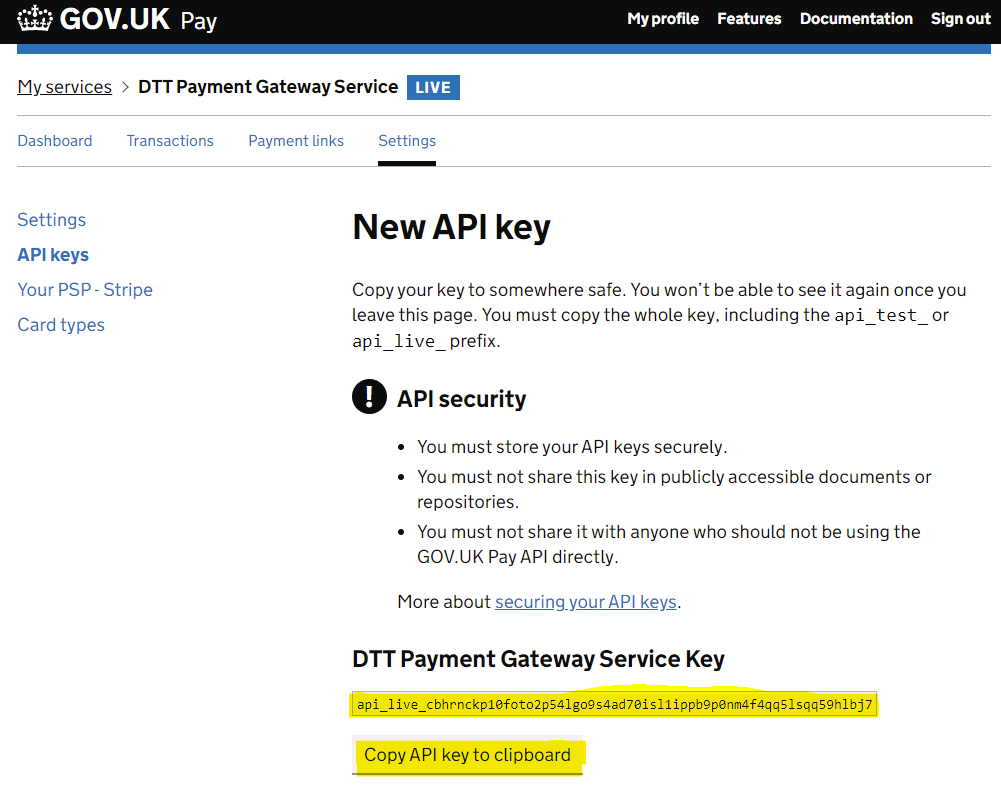
Important: The user has the opportunity to copy the key on this screen, but cannot retieve the key from the portal after leaving this screen.
Once the user has copied the key it is then set up on the DTT payment gateway service as described in Section 4.3
4. DTT Platform Configuration
In order to configyre the Payment Gateway on the Digital Transaction Toolkit the following steps will need to be completed:
- Set up a new tenant to host the payment service. This step is only required if there is no existing tenant that can be used to host the payment service.
- Configure the tenant with the new payment gateway service.
- Configure the payment gateway service to allow payment requests.
- Once the payment gateway service has been associated with a tenant the user who will administer the DTT payment service needs to be added to the ServiceAdmin role
The following sections will describe the payment gateway configuration steps as the tenant and payment gateway service configuration are standard steps covered by the platform administration documentation.
4.1 Payment Gateway Service Configuration
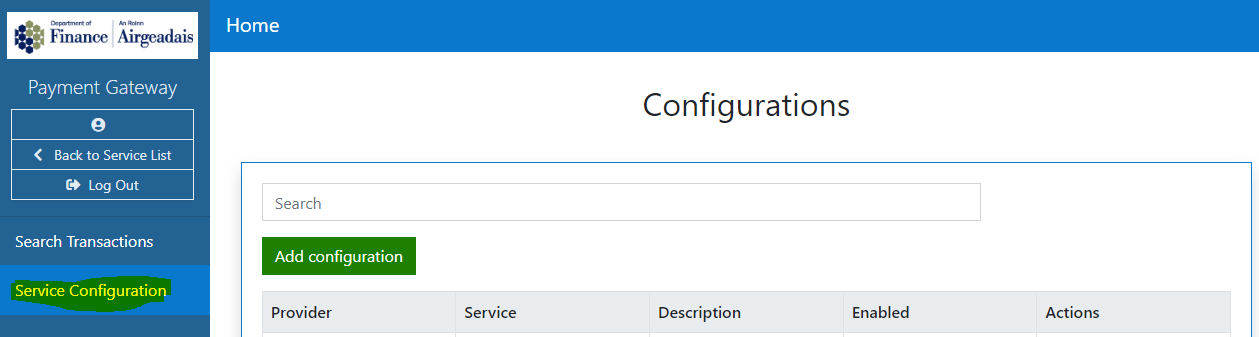
After accessing the tenant hosting the Payment Gateway Service it will appear as follows:

The user then clicks on the link highlighted in the screen shot above and will be presented with the following screen:
The payment gateway service has been developed to allow multiple providers to be configured whilst providing a standard interface for external third parties to use for any of the providers. At time of writing there are two providers available on the payment gateway: WorldPay and GovUK Pay. The platform requires a standard set of configuration which is applicable to all payment providers and then specific configuration data associated with each of the providers. The following sections provides the specific configuration details.
4.1.1 Payment Provider Configuration
When the user clicks on the 'Add Configuration' button as displyed in the previous screenshot, they will be presented with the Provider Configuration Screen. If no configuration data has been created then no Authorisation Token will be generated as displayed in the screenshot below:

The screen will have a pre-filled list of providers that can be selected using the Provider drop down list. Depending on which provider is selected the configuration data will be different. The following sections describe the common configuration data to all providers. Once configuration data has been saved for the provider then the system will generate an Authorization Token as displayed below.

4.1.2 Common Configuration Data for All Payment Providers
| Value | Description | Sample Value |
|---|---|---|
| Authorization Token | System generated authorization token which is required for a third party to be able to integrate with the Payment Gateway Service. This field is automatically generated by the system after the configuration data has been saved to the database. Figure 6 above shows the display when there is no token generated. Figure 7 above shows the Authorization Token after it has been generated. | vK0tacTFXhNbBkLZ7asOKccZQ6DknR0++G0x31Vz4H4= |
| Payment Provider | Read only , drop down list of payment providers currently supported by the Payment Gateway service. | Current providers are: WorldPay and GOV UK Pay |
| Service | This is an identifier used by the calling service to access the payment configuration data. This information is encrypted in the Authorization Token and sent to the integration provider. | Fixed Penalty |
| Description | Free text describing the service | This is the payment service for the Fines Department |
| Enabled | Switch that allows the service to be enabled/disabled. | True/False |
| Success Redirect URL | This is the URL that the service should redirect back to upon a successful payment. | https://platformpublicdev.local.net/#/success |
| Failed Redirect URL | This is the URL that the service should redirect back to upon a failed payment. | https://platformpublicdev.local.net/#/failed |
4.2 World Pay provider Configuration
The screenshot above displays the Provider Configuration screen when a user has chosen World Pay as the payment provider. All information had been completed and saved which is why the Authorization token is displayed.
All of the common configuration data needs to be configured as described in the Common Configuration Data section above along with the World Pay specific data described in the table below.
| Value | Description | Sample Value |
|---|---|---|
| Merchant Code | This is the code that World Pay will provide when they set up the Merchant Account | DTSTEST |
| Installation ID | This is the identifier associated with the portal that is configuered for a new World Pay corporate portal | 1429050 |
| Authorization | This is the authorization header required for the integration (Refer to section 2.1.1 for more information) | Dtstest:snipPa55w0rd! |
| Hash Secret | This is a secret up in the World Pay portal so responses from the World Pay payment service can be validated. | fA0c15fb9a8f436ebc$d479e3 |
| Test Mode | The world pat corporate gateway allows the accoun to be swithced between test and production mode. | True/False |
4.3 GovUk Pay provider configuration
Below displays the Provider configuration screen when a user has chosen GovUk Pay as the payment provider. All information has been completed and saved which is the reason why the authorisation token is displayed.
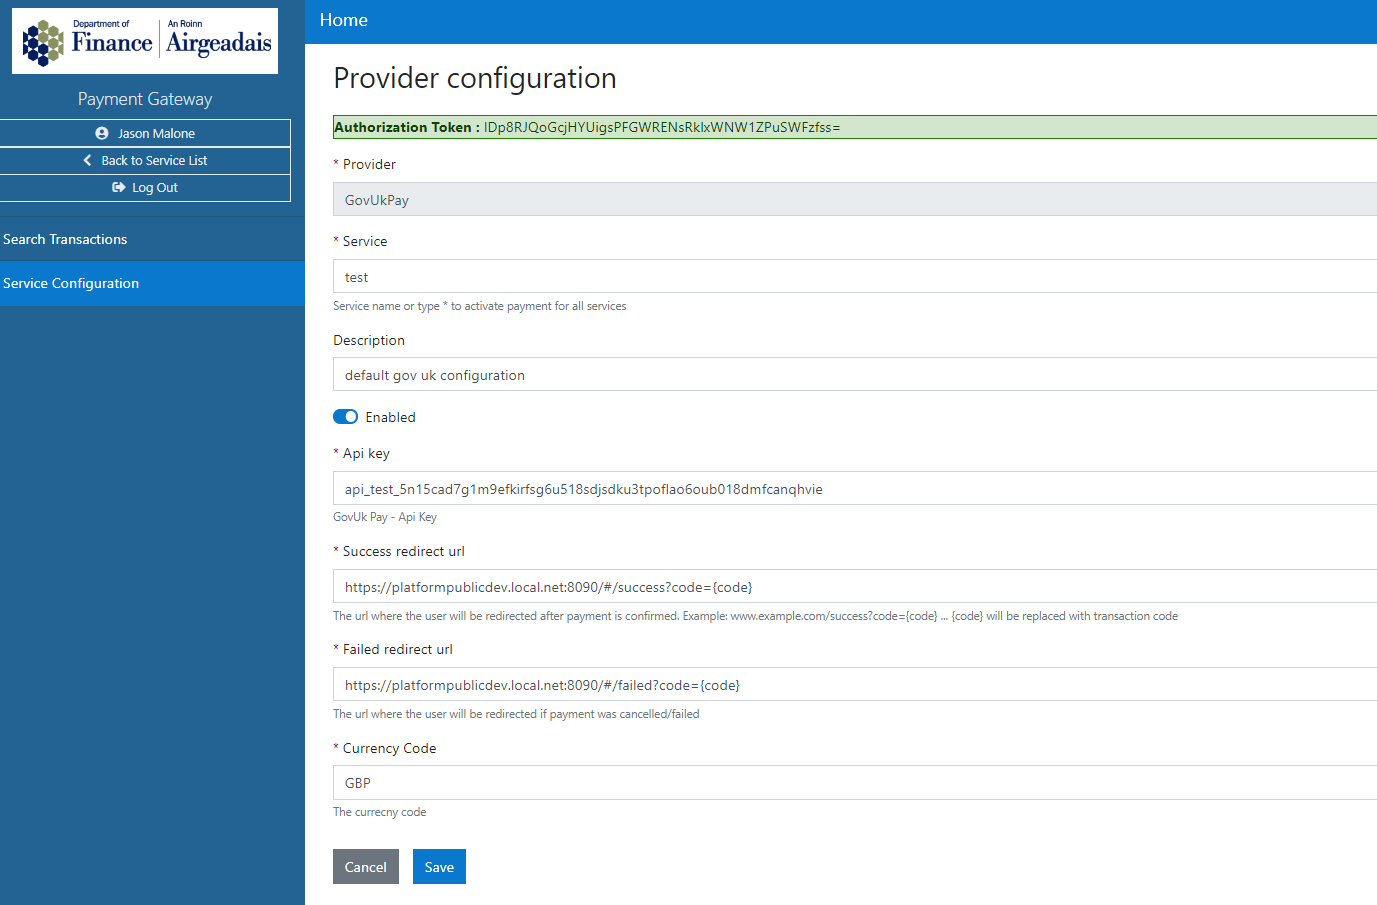
All of the common configuration data needs to be configured as described in the Common Configuration Data section above along with the Gov Uk Pay specific data described in the table below.
| Value | Description | Sample Value |
|---|---|---|
| API Key | This is the APi key generated on the GovUK Pay Portal | api_test_5n15cad7g1m9efkirfsg6u518sdjsdku3tpoflao6oub018dmfcanqhvie |
5. DTT Payment Gateway Integration
The previous sections provided details on setting up the data that will be used by the payment integration providers to send payment requests. The following sections of the document provide the details of how a third party will integrate into the DTT Payment Gateway.
5.1 Payment Sequence Flow
The following sequence diagram illustrates the data flow between the different systems:
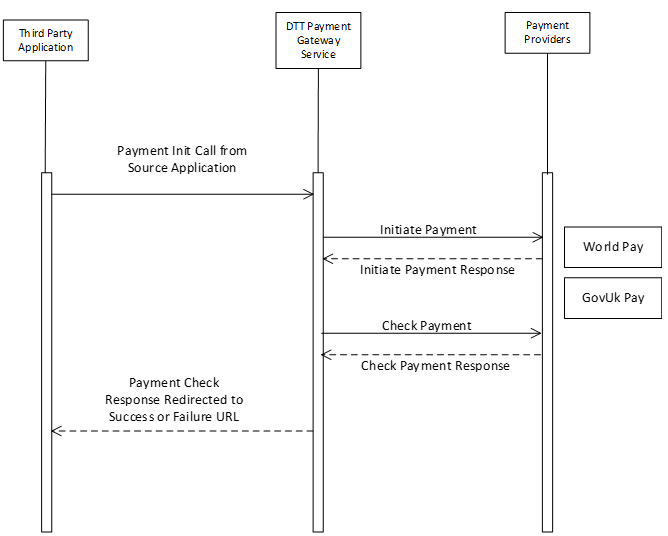
The DTT payment gateway interface provides a common payment interface that abstracts the implementation details of the individual payment provider from the third party integrator.
5.2 Payment Request
There is a test environment and a production environment which host the Payment Gateway services the two URLs are defined below:
| Environment | Address |
|---|---|
| Test | https://dttapitenant-ppd.public.nics.gov.uk/paymentgatewayservice/api/payment/init |
| Production | https://dttapitenant.public.nics.gov.uk/paymentgatewayservice /api/payment/init |
5.2.1 Payment Request Definition
| Description | Additional Details | |
|---|---|---|
| Request Type | https request | |
| Request Verb | POST | |
| Request Body Definition | JSON request | {accessToken:"String" paymentReference:"String" desciption:"String" amount:"0"} |
5.2.2 JSON Filed Definitions
Note: All the JSON fields are MANDATORY
| Field | Description | Validation |
|---|---|---|
| AccessToken | This is a token generated by the DTT Payment Gateway admin as described in section 3.1 above. | Token is a fixed value pre-validated by DTT Platform, so does not require any additional validation by the integration provider. |
| PaymentReference | The payment reference is the unique id generated by the integration provider to associate their transaction with the actual payment. | The integration provider should ensure that the payment reference conforms to the following rules: Maximum Length is 37. Can only contain Alpha Numeric characters with no spaces. |
| Description | This is a short description which provides additional details about the payment. | Maximum Length is 255. Can only contain Alpha Numeric characters including spaces. |
| Amount | This is the amount of the payment and should be passed as a value in pence. So for example if the transaction costs £10 then the value will be passed as 1000. | Is an integer value representing the amount in pence. The payment providers do provide multi-currency but this feature is not enabled as part of the Payment Gateway integration. |
5.2.3 Request Responses
| Description | Additional Details |
|---|---|
| 200 | Payment Transaction has been successful |
| 400 | Data sent as part of the JSON payload is invalid. Refer to table above regarding the validation details for each field. |
| 500 | System error. If encountered please raise incident with DTT support team. |
6. Sample Payment Initiation Pages
To help third parties integrate into the Payment Gateway service a very simple html page has been included as part of the integration pack. The page has been pre-configured with an Access Token for the test system: https://dttapitenant-ppd.public.nics.gov.uk/paymentgatewayservice /api/payment/init In order to see how the integration works it is necessary to host the page on a web server. There are many ways of doing this, but the following instructions provide a simple way of serving the page in a development environment with minimal installation. It uses VS Code and the Live Server VS Code Extension.
Download the visual studio code IDE at Download Visual Studio Code - Mac, Linux, Windows
Install VS Code on your development environment.
Open VS Code and go to the View menu option and Select extensions
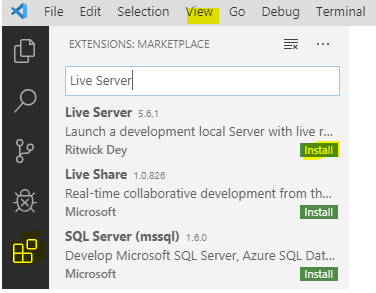
Type Live Server into the extensions and install it.
Next, create a new folder, call it PaymentSample and create a new file in VS Code under that folder called PaymentInit.html. Then copy all the code from below into that page and save it.
Once the file has been saved simply Right Click on the file and you should see an option – Open with Live Server. Select that option and this will serve the payment Init page and allow you to post a transaction to the World Pay payment provider.
<!doctype html>
<html lang="en">
  <head>
    <!-- Required meta tags -->
    <meta charset="utf-8">
    <meta name="viewport" content="width=device-width, initial-scale=1">

    <!-- Bootstrap CSS -->
    <link href="https://cdn.jsdelivr.net/npm/bootstrap@5.0.2/dist/css/bootstrap.min.css" rel="stylesheet" integrity="sha384-EVSTQN3/azprG1Anm3QDgpJLIm9Nao0Yz1ztcQTwFspd3yD65VohhpuuCOmLASjC" crossorigin="anonymous">
     <style>
       .required-field{
                      color:red;
                      font-size:20px;
                      /*position:absolute;
                      top:-50;*/
                  }
     </style>
    <title>Payment Gateway : Init Payment</title>
  </head>
  <body>

    <nav class="navbar navbar-expand-md navbar-dark fixed-top bg-dark">
      <div class="container-fluid">
        <a class="navbar-brand" href="#"></a>
        <button class="navbar-toggler" type="button" data-bs-toggle="collapse" data-bs-target="#navbarCollapse" aria-controls="navbarCollapse" aria-expanded="false" aria-label="Toggle navigation">
          <span class="navbar-toggler-icon"></span>
        </button>
        <div class="collapse navbar-collapse" id="navbarCollapse">


        </div>
      </div>
    </nav>

    <main class="container">

        <div id="submitpayment" class="bg-light p-5 rounded">
            <h1>Example Payment Initialisation</h1>
            <form id="initpayform" class="row g-3">
                <div class="col-12">
                    <span class="required-field">*</span><label for="accessToken" class="form-label">Access Token</label>
                    <input class="form-control" type="text" id="accessToken" name="accessToken" value="S0ldOkQaF5bgk2+WC/aoTGbZZtH6WUZE2UXWbIWDxMg=">
                    <div id="accessTokenHelp" class="form-text">Access token provided by the Digital Shared Services Team. </div>
                    <div id="accessTokenHelp2" class="form-text"><i>Token above is for test purposes only.</i></div>
                </div>
                <div class="col-md-6">
                    <span class="required-field">*</span><label for="paymentReference" class="form-label">Payment Reference</label>
                    <input class="form-control" type="text" id="paymentReference" name="paymentReference" required placeholder="Enter payment reference..">
                    <div id="paymentReferenceHelp" class="form-text">This is the unique reference associated with payment.</div>
                    <div id="paymentReferenceHelp2" class="form-text"><i>This should be generated by your application.Max length 37</i></div>

                </div>
                <div class="col-md-6">
                    <span class="required-field">*</span><label for="amount" class="form-label">Amount</label>
                    <input class="form-control" type="text" id="amount" name="amount" required placeholder="Enter amount..">
                    <div id="amountHelp" class="form-text">Cost of the product or service in pence.</div>
                    <div id="amountHelp2" class="form-text"><i>Always entered as pence e.g. £10 is entered as 1000</i></div>
                </div>

                <div class="col-12">
                    <span class="required-field">*</span><label for="description" class="form-label">Description</label>
                    <input type="text" class="form-control" id="description" name="description" required maxlength="255" placeholder="Enter Description ....">
                    <div id="descriptionHelp" class="form-text">Text description associated with payment. </div>
                    <div id="descriptionHelp" class="form-text"><i>Max length of 255</i></div>
                </div>

                <button type="submit" class="btn btn-success">Submit Test Payment</button>

            </form>

        </div>
        <div id="redirecttoprovider" class="bg-light p-5 rounded text-center">
          <h2>Redirecting to payment provider, please wait...</h2>
         </div>

    </main>


dotnetcli

  </body>
  </html>
  <script>

    // Add event listner to form
    const form = document.getElementById('initpayform');
    form.addEventListener('submit', handleSubmit);

      const submitpaymentdisplay = document.getElementById('submitpayment');
      const redirectdisplay = document.getElementById('redirecttoprovider');
      redirectdisplay.style.display='none'

    function InitiatePayment(data)
    {

      fetch('https://dttapitenant-ppd.public.nics.gov.uk/paymentgatewayservice/api/Payment/init', {
        method: 'POST', // or 'PUT'
        headers: {
        'Content-Type': 'application/json',
        },
        body: JSON.stringify(data),
      })
      .then(response => response.json())
      .then(data => {

        window.location.replace(data.redirectUrl);

      })
      .catch((error) => {
        console.error('Error:', error);
      });
    }

    function handleSubmit(event) {
        event.preventDefault();

        const data = new FormData(event.target);

        const paymentpayload = Object.fromEntries(data.entries());
        submitpaymentdisplay.style.display = 'none';
        redirectdisplay.style.display='inline';
        const paymentinitresponse = InitiatePayment(paymentpayload)


      }


    </script>
    <script src="https://cdn.jsdelivr.net/npm/bootstrap@5.0.2/dist/js/bootstrap.bundle.min.js" integrity="sha384-MrcW6ZMFYlzcLA8Nl+NtUVF0sA7MsXsP1UyJoMp4YLEuNSfAP+JcXn/tWtIaxVXM" crossorigin="anonymous"></script>
- Once the file has been saved simply Right Click on the file and you should see an option – Open with Live Server. Select that option and this will serve the payment Init page and allow you to post a transaction to the World Pay payment provider.