District & Unit Managers
Careers Service Hierarchy
There are a number of different types of users on the system. Depending on their roles they will be able to see and do different things. They will also exist at different levels within the hierarchy.
The Careers Admin team will build the system hierarchy by creating relationships between the different users (see diagram below)
- Schools have been allocated to Advisers
- Advisers have been allocated to Unit Managers
- Unit Managers have been allocated to District Managers
So, for example:
- Applications and feedback enter the system associated to St. Paul's School
- The careers adviser Miss Jones is assigned to St. Paul's and therefore, has access to all of its applications and feedback (this is the same for all the schools she is assigned to)
- Miss Jones is linked to a ‘Unit Manager’; therefore, Mr Smith as her unit manager has view access to all her school’s applications and feedback (this is the same for all the careers advisers under Mr Smith)
- Mr Smith is linked to a ‘District Manager’; therefore, Mrs Murphy as his district manager has view access over all of his adviser’s school’s applications and feedback (this is the same for all the unit managers under Mrs Murphy).
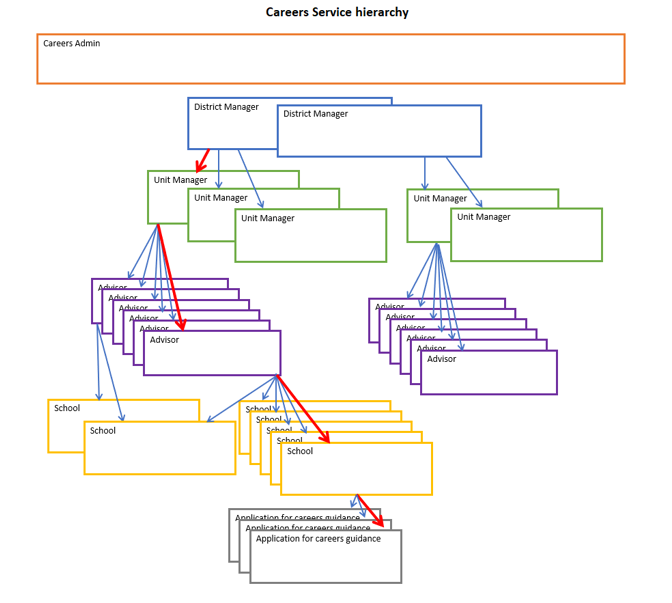
This means that each District and Unit Manager will have visibility over only the applications and feedback forms they are entitled to see, based on their relationships to the other users.
Note
The red line in the diagram above displays how a user can drill down to view a student application that there are configured to see.
Dashboard
Navigating the Service - Upon logging into the Admin system, a user that has been granted a ‘UnitManager’ or ‘District Manager’ role will see the following:
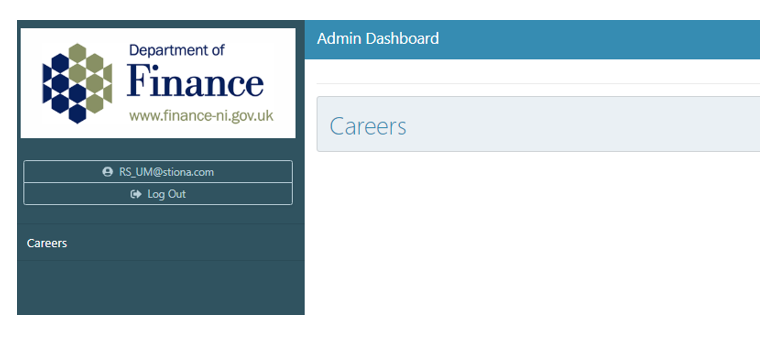 In order to enter the service, the user can click the ‘Careers’ link or menu item.
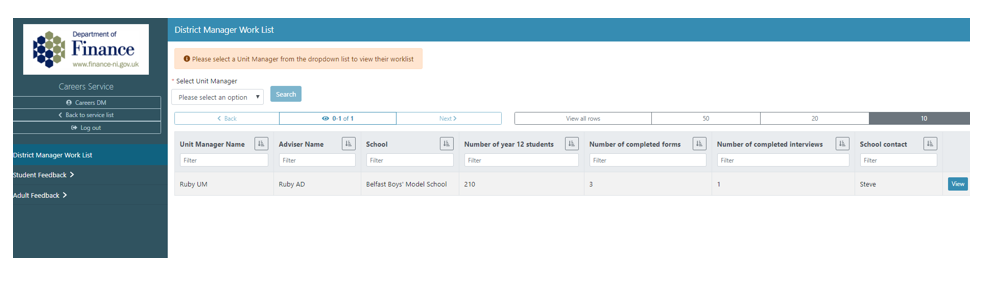
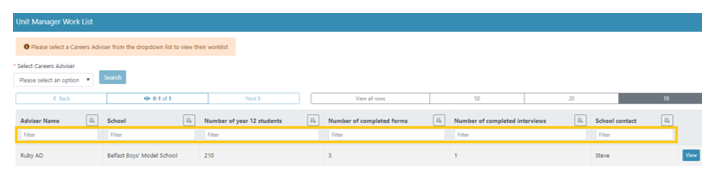
Worklist View
Once the user has entered the service the relevant dropdown lists will be displayed, these are specific to the logged in user.
 To view a District Manager’s worklist:
- Select a Unit Manager from the dropdown list (will only contain unit managers that the district manager is linked to)
- Select a Careers Adviser from the dropdown list (will only contain advisers linked to the unit manager selected above)
- Click ‘Search’ button to display a list of all the schools assigned to the adviser selected above.
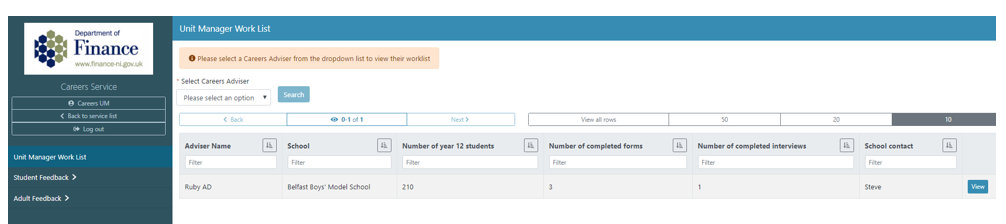
 To view a Unit Manager’s worklist:
- Select a Careers Adviser from the dropdown list (will only contain advisers that the unit manager is linked to)
- Click ‘Search’ button to display a list of all the schools assigned to the adviser selected above
From the worklist, they will be able to drill down through the school to its applications.
Each worklist view will display the same information in table form, the only difference will be the District Manager has an additional ‘Unit Manager Name’ column in the table which they can filter on.
The Work List (as with all list views in the system) can be filtered depending on search criteria by typing into the free text area labelled ‘Filter’ which appears under each of the table headings.
Filters available:
Unit Manager Name
Adviser Name
School
Number of Year 12 Students (set in school configuration)
Number of completed forms (calculated by system and incremented for each application submitted against that school)
Number of completed interviews (number is incremented when the Adviser clicks the ‘Interview Complete’ button for an application raised against that school)
School Contact (set in school configuration)
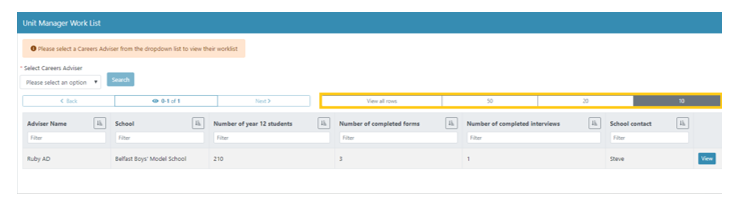
Users also have a range of view options for the list views within this service. A user can depict how many table entries they wish to view on one page by clicking the buttons highlighted below. Pages can be traversed using the ‘Next’ and ‘Back’ buttons.
 To view a student application the user must first select the school they wish to enter and click the blue ‘View’ button located at the right-hand side of the application.
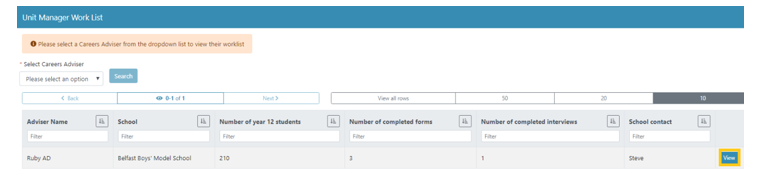
This button will navigate the user to a list view of the selected school’s application forms.
Application List View
In this view, the user will only be able to view applications submitted against the school they selected in their work list.
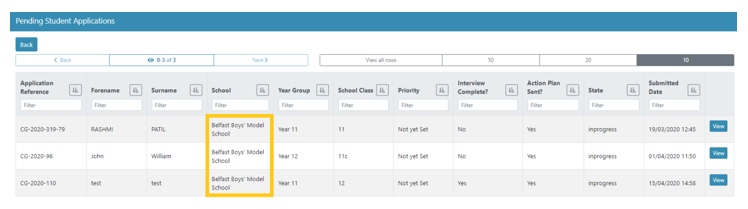
All applications have been assigned a state
- Applications with a ‘new’ state have not been started by a Careers Adviser
- Applications with an ‘InProgress’ state have been started but are not yet complete
- Applications with a ‘complete’ status have been completed by the Careers Adviser
Some additional information on the following columns:
- Application Reference: a unique id automatically generated on submission
- Priority: this will display a value of ‘Not yet set’ until the adviser sets a priority level.
- Interview Complete: this will display as ‘No’ until the adviser clicks the ‘Interview Complete’ button which will set it to ‘Yes’
- Action Plan Sent: this will display as ‘No’ until the adviser clicks the ‘Send Email’ button which will set it to ‘Yes’
All applications regardless of state are available to view by clicking the blue ‘View’ button.
Application Details View
The Application details view, will display the application submitted by the student and any and all actions performed against it by the Adviser processing it.
Click ‘View’ to enter the Students Details View.
Please note- Application details view is a Read Only view of a student application, no actions can be implemented by the District/Unit Manager
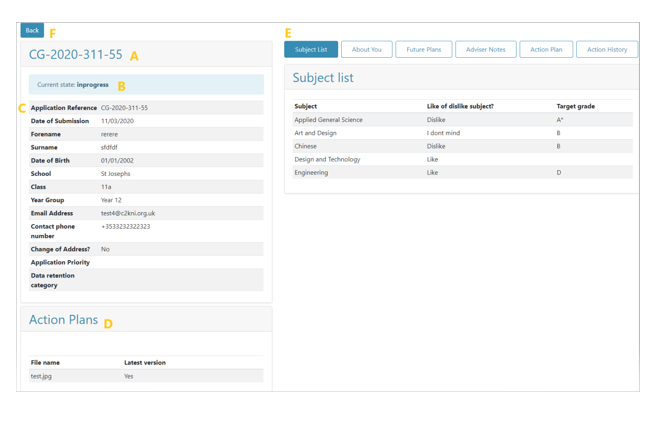
A. Reference Number: unique ID automatically generate on submission
B. Application State: the current status of the application (inprogress/complete)
C. Applicant Details: Information provided by the student in their application form.
D. Action Plan File: Once an Action Plan PDF has been generated by an Adviser it will automatically be uploaded into the action plan section.
E. Navigation Panels: allows the user to navigate through all parts of the application form
F. Back button: to return to school list view
Student Application
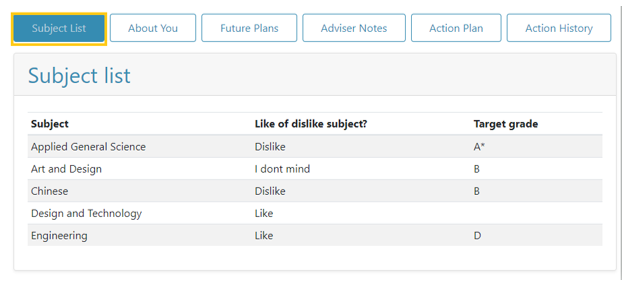
Subject List
Student has provided these details during completion of Step 2: Subjects
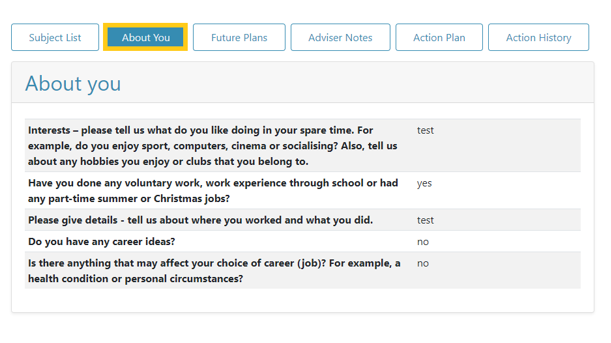
About You
Student has provided these details during completion of Step 3: About You
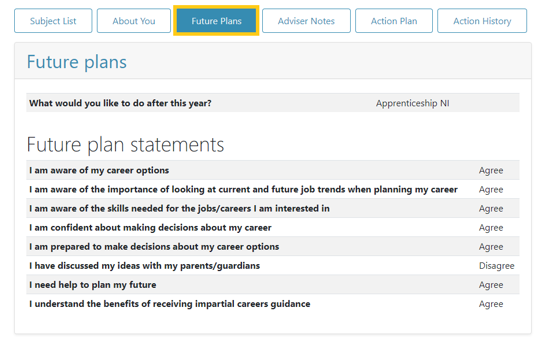
Future Plans
Student has provided these details during completion of step 4: Future Plans
Application Processing Information
The following panels are updated by the Adviser who is handling this application and interacting with the student. As they work their way through the process, they will update each section. As their Unit or District Manager, you will see a read-only view of their progress.
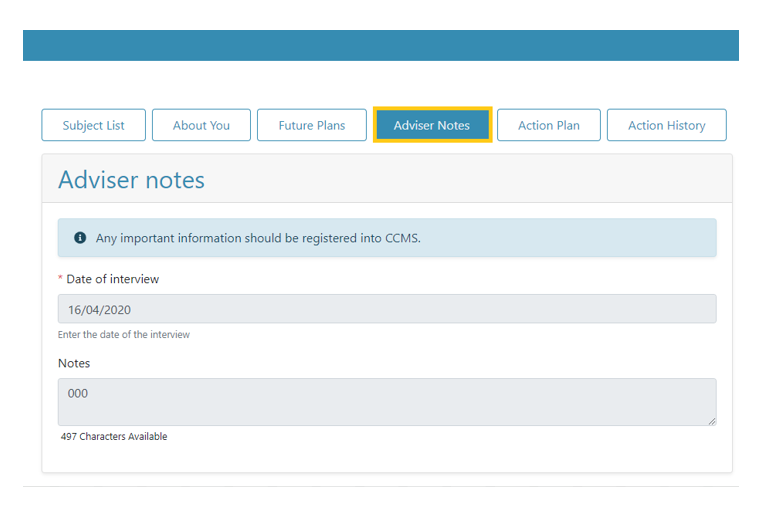
Adviser Notes
Displays a read-only view of details entered by the adviser in relation to student interview process, such as interview date and any notes entered.
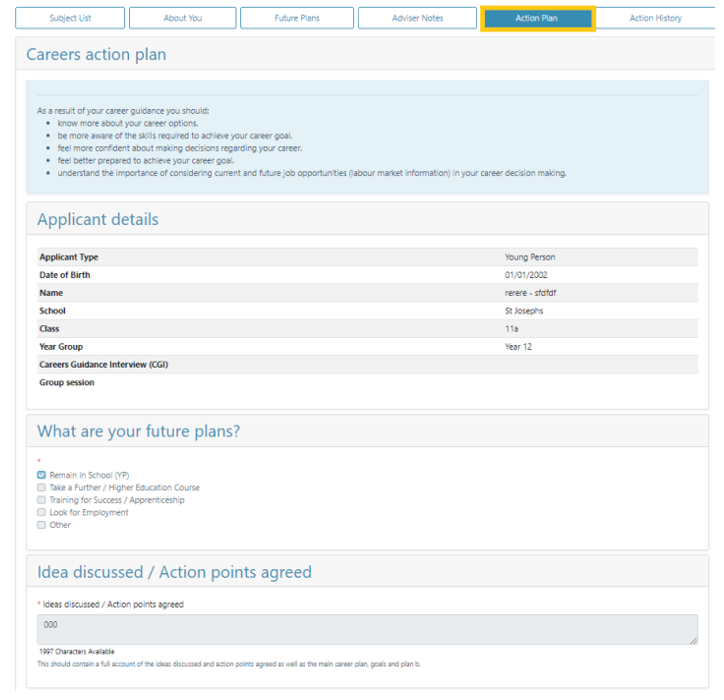
Action Plan
Displays a read-only view of the Action Plan that the adviser has drawn up for the student
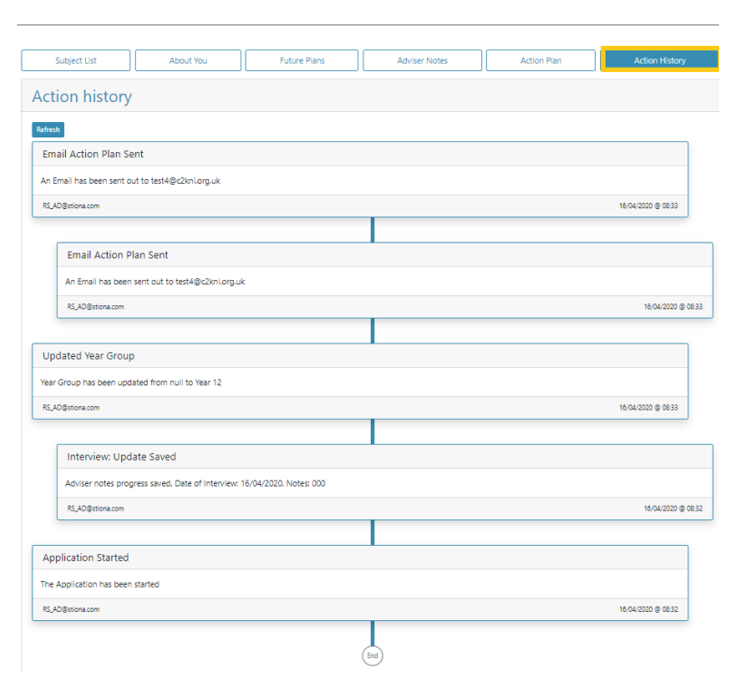
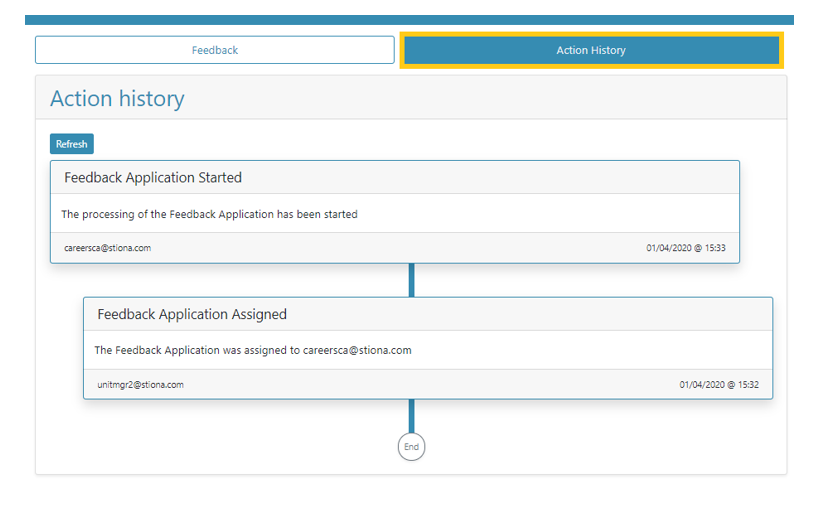
Action History
This panel is very useful as it displays an audit of all actions performed against this application; it includes the user who performed the action, a description of the action and the date/time it took place.
Student Feedback
Once the Adviser has sent the Action Plan to the student, they will receive an email with two links:
- Action Plan
- Student Feedback Form
The student has the opportunity to provide feedback about their experience with the careers service interview process.
Once submitted by the student, this feedback will enter into Admin and be available in the appropriate Feedback list view.
Please note - the system will set ALL forms that require follow up to a status of ‘unassigned,’ all the rest will be set to ‘Completed’.
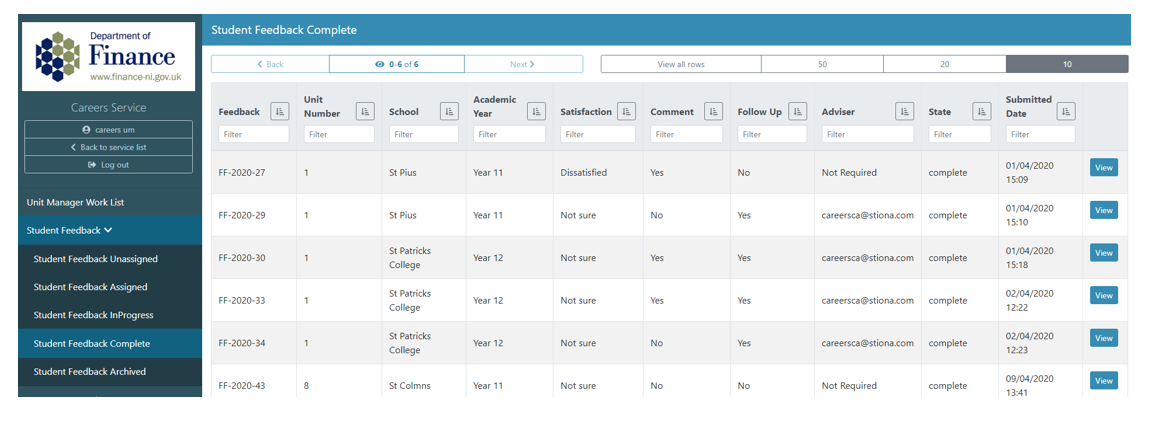
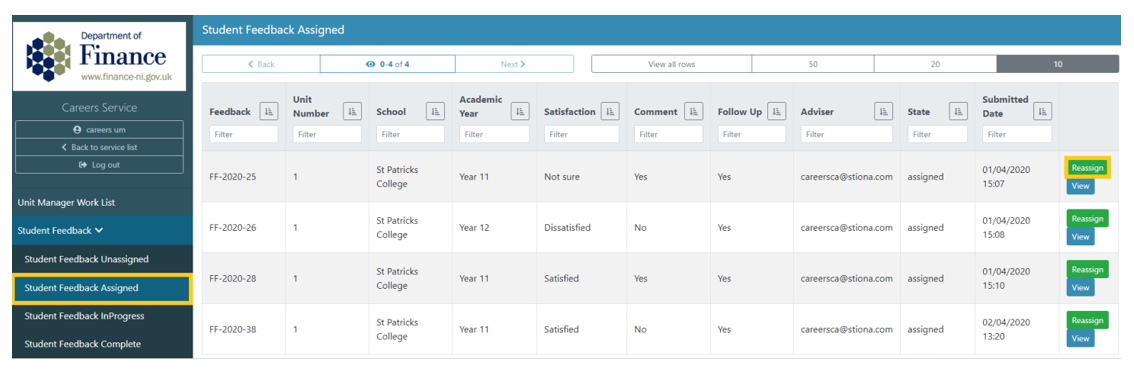
On the left-hand navigation panel below your ‘Work List’ is the ‘Student Feedback’ menu item. When clicked, it will display the various feedback list views available.
District Manager: each list view will display the same information in table form, the action button will always appear as a ‘View’ button to allow you to open a read-only view of the feedback form.
Unit Manager: each list view will display the same information in table form, the action button will always appear as a ‘View’ button to allow you to open a read-only version of the feedback form. For the ‘Unassigned’ list view only, the Unit Manager will see an ‘Assign’ button which they can use to assign that specific feedback to an adviser of their choice. For the ‘Assigned’ list view only, the Unit Manager will see an ‘Reassign’ button which they can use to reassign that specific feedback.
o Unassigned – this list will contain, all new feedback forms submitted that require follow up
o Assigned – this list will contain, all feedback forms requiring follow up that have been assigned to advisers by unit managers.
o InProgress – this list will contain, all feedback forms which are being processed by Advisers.
o Complete – this list will contain all feedback forms that have been completed.
Please note - Feedback forms displayed are only those you are configured to see based on your relationships. This works exactly the same way as your access to the applications does.
Each list view can be filtered by typing into the free text area labelled ‘Filter’ which appears under each of the table headings. For example, you can display all forms submitted with comments added, by using the comments added filter.
 Where feedback has been received which has indicated that it requires Adviser follow-up, it is the role of the Unit Manager to assign this feedback.
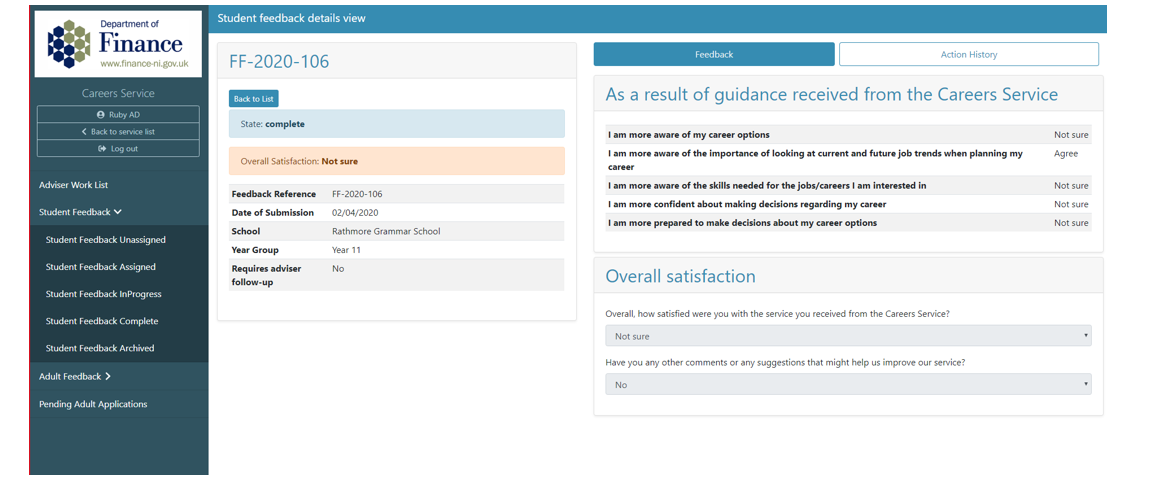
Student Feedback Details View
Click ‘View’ in any of the feedback list views to enter ‘Student Feedback Details View’
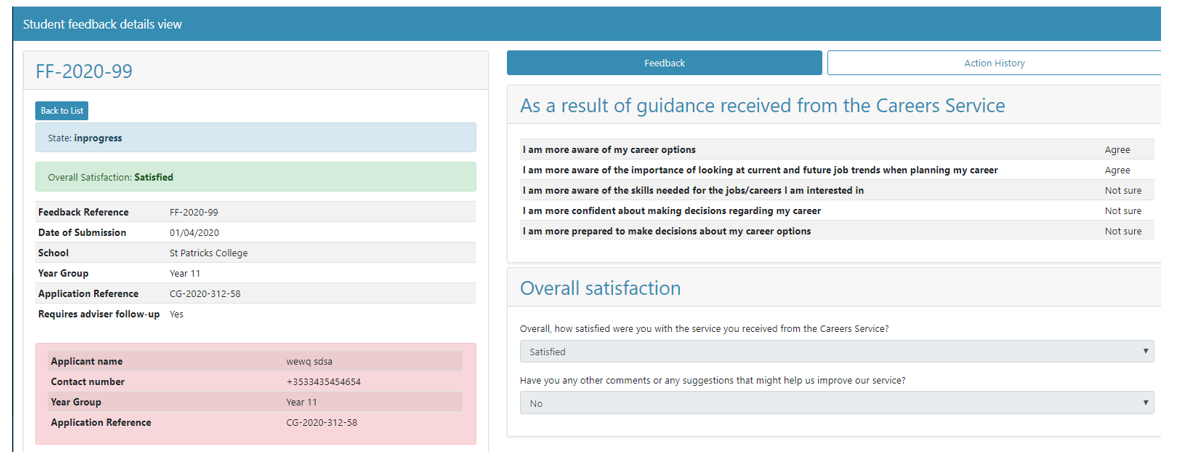
This view is Read Only – a user can navigate through the Feedback and Action History panels to view further details. All feedback forms that require follow up will display a red contact box detailing the students preferred contact method.
The Action History panel will document all actions performed on this feedback, recording the action, user, date and time performed.
Assigning Student Feedback (Unit Manager only)
Unit Managers have the ability to assign and reassign feedback to specific Careers Advisers. They do this via the unassigned and assigned feedback list views.
District Managers can view unassigned and assigned feedback but they do not have access to action it.
To assign student feedback to a Careers Adviser, Unit Manager must
- Click the ‘Student Feedback Unassigned’ tab
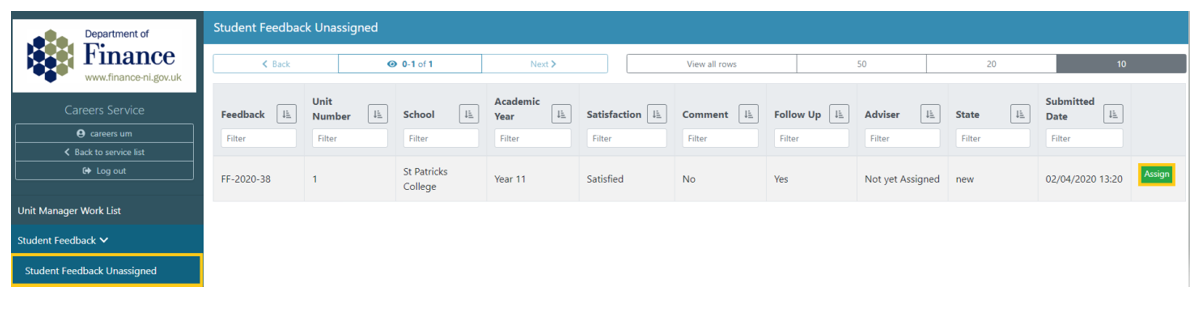 Each Feedback view will display the same information in table form, the only difference will be the District Manager has a ‘view’ button and the Unit Manager has a ‘Assign’ button.
 - Click the green ‘Assign’ button to assign the feedback, a modal will be launched.
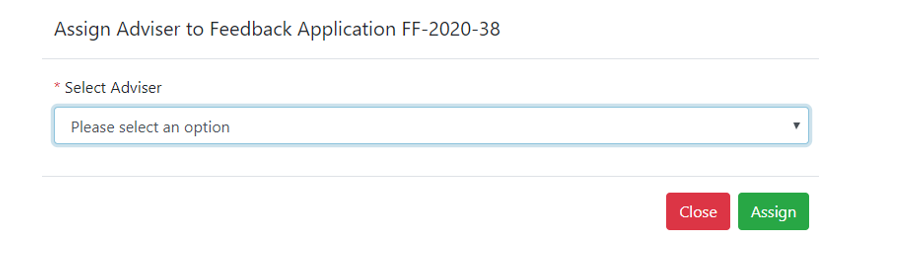
- Select an Adviser from the dropdown list
- Click ‘Assign’ button, this will trigger the following:
- Feedback state will change from ‘new’ to ‘assigned’
- Adviser column will be populated with assigned Advisers email address
- Feedback will move from unassigned tab into assigned tab in your view
- Feedback will be added to the Advisers ‘Assigned Student Feedback’ tab
Reassigning Student Feedback (Unit Manager Only)
In order to reassign feedback to a Careers Adviser, Unit Manager must
- Click the ‘Student Feedback Assigned’ tab.
 Each Feedback view will display the same information in table form, the only difference will be the District Manager has a ‘view’ button and the Unit Manager has a ‘View’ and ‘Reassign’ button.
 - Click the green ‘Reassign’ button to reassign the feedback, a modal will be launched.
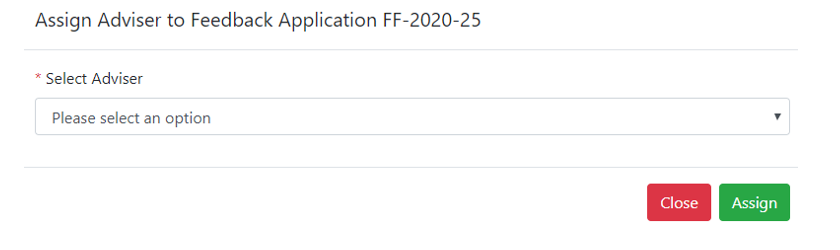
- Select an Adviser from the dropdown list
- Click ‘Assign’ button, this will trigger the following:
- Feedback state will remain ‘assigned’
- Adviser column will now display the new Advisers email address
- Feedback will remain in the assigned tab in your view
- Feedback will be removed from previous Advisers ‘Assigned Student Feedback’ tab
- Feedback will be added to the new Advisers ‘Assigned Student Feedback’ tab
Feedback not requiring follow up
All feedback forms which do not require follow up will enter the system as completed and be available for view. These forms will essentially be anonymous and will only contain the school and year group for that student. The application ID will not be visible and there will be no red contact box displayed.
If the identity of the student is required for a valid child protection reason, a user granted the FeedbackAdmin role has the ability to retrieve that student’s application ID, thus allowing the student to be identified.
Trigger Words Feature
A trigger word feature has been added to the careers service application. This feature enables Advisers to easily identify students who may be at risk and action/escalate.
A list of 'Trigger words' has been determined and listed within the admin side of the service. If a student has matched any of these trigger words within free text areas of their application - the system will turn this entry red within the 'Pending Student Applications' view to alert the user.
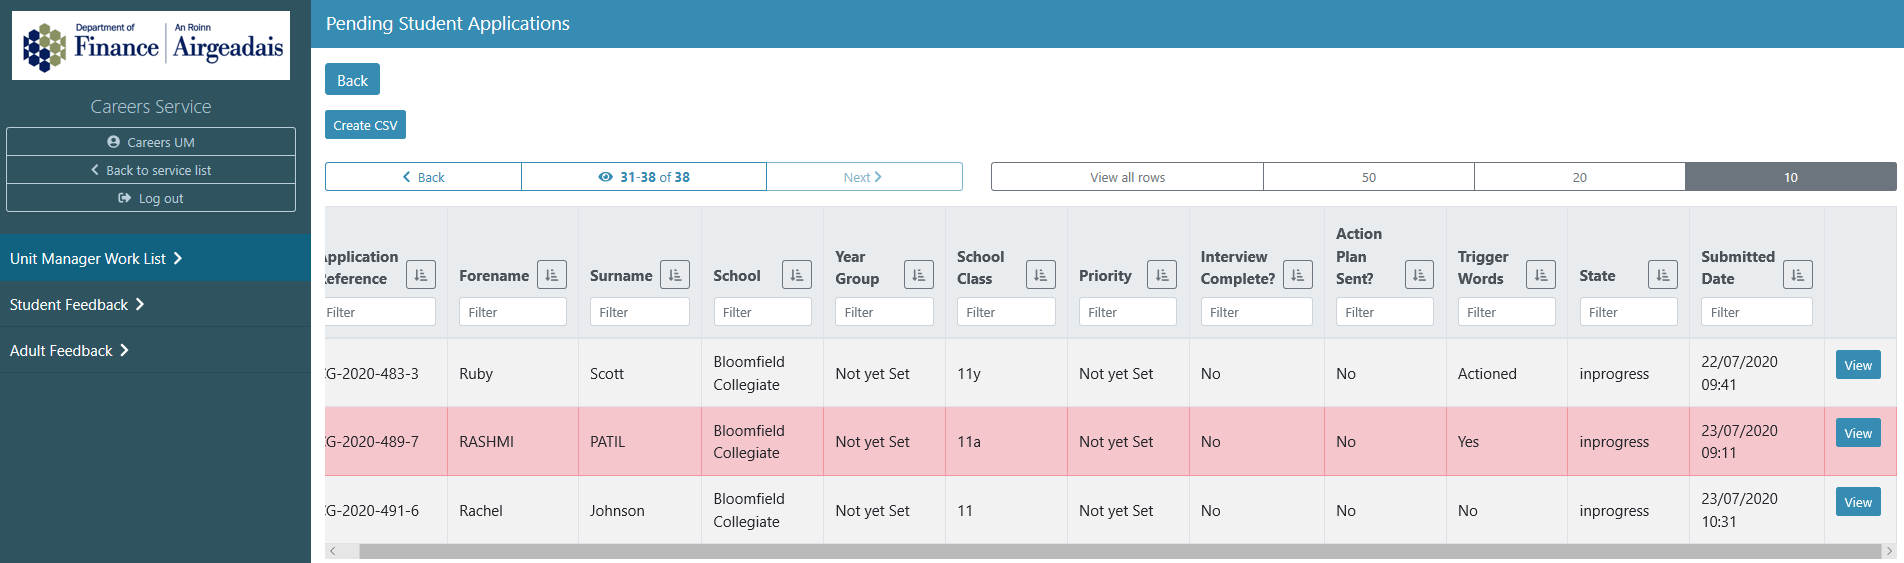
A column has been added to the 'Pending Student Applications' view. This column will display: Yes, Actioned or No.
Yes - The entry will be in red to alert the user, as no action has been taken by the Adviser.
Actioned - The entry will no longer be in red as the Adviser has taken action against this application and a trigger word update will be displayed in the Action History.
No - The system did not find any trigger words within the application.
To view the trigger words the student has entered click 'View' to enter into 'Student Application Details View.'
Below the student details, a section labelled 'Trigger Words' has been added. Triggered words identified within the student's application will be listed here.
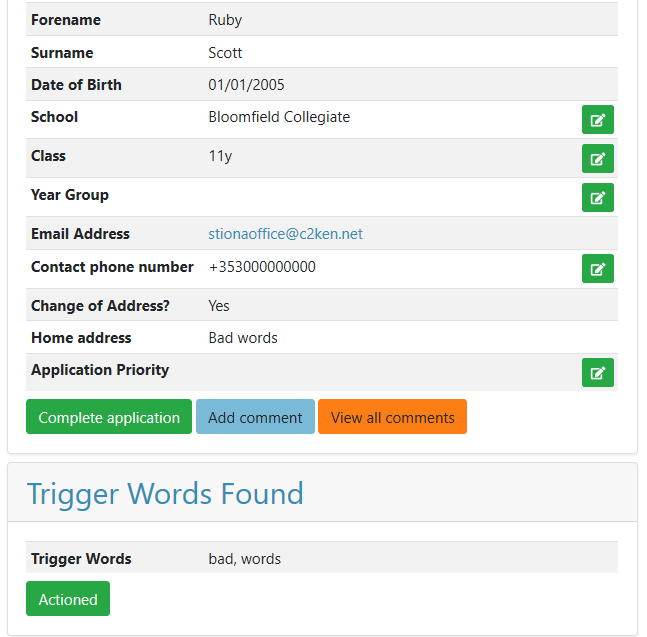
In this application, the system has identified the student as entering 'bad words' as their home address.
Note
The system will check for trigger words in any free text area that the student has entered data.
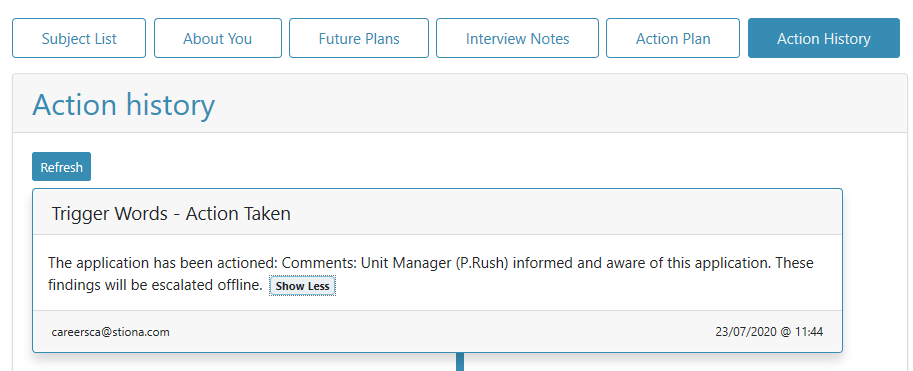
If the Adviser has actioned the trigger words, click the 'Action History' panel to view details. The action history will display the username, time and date the action was taken. When actioning the trigger words the Adviser has an optional comment box which can be used to detail their actions - the comment will also be available to read in this 'Trigger Words - Action Taken' entry.
Important
Advisers are able to process applications containing trigger words in the same manner as applications not containing trigger words. It is at the discretion of the adviser to 'Action' the trigger words on the service for traceability in the Action History panel. Further appropriate action taken will be carried out offline.
The same 'Trigger Words' feature is available in student feedback.

A 'Trigger Words' column has been added to the 'Student Feedback' view. This column will display: Yes, Actioned or No.
Yes - The entry will be in red to alert the user, as no action has been taken by the Adviser.
Actioned - The entry will no longer be in red as the Adviser has taken action against this application and a trigger word update will be displayed in the Action History.
No - The system did not find any trigger words within the feedback form.
First the feedback must be assigned to an Adviser by the Unit Manager using the 'Assign' button.
To view the trigger words the student has entered, click into the 'Student Feedback Assigned' Panel and click 'View' to enter the 'Student Feedback Details View.'
The trigger word section is displayed on the right hand side of the screen.
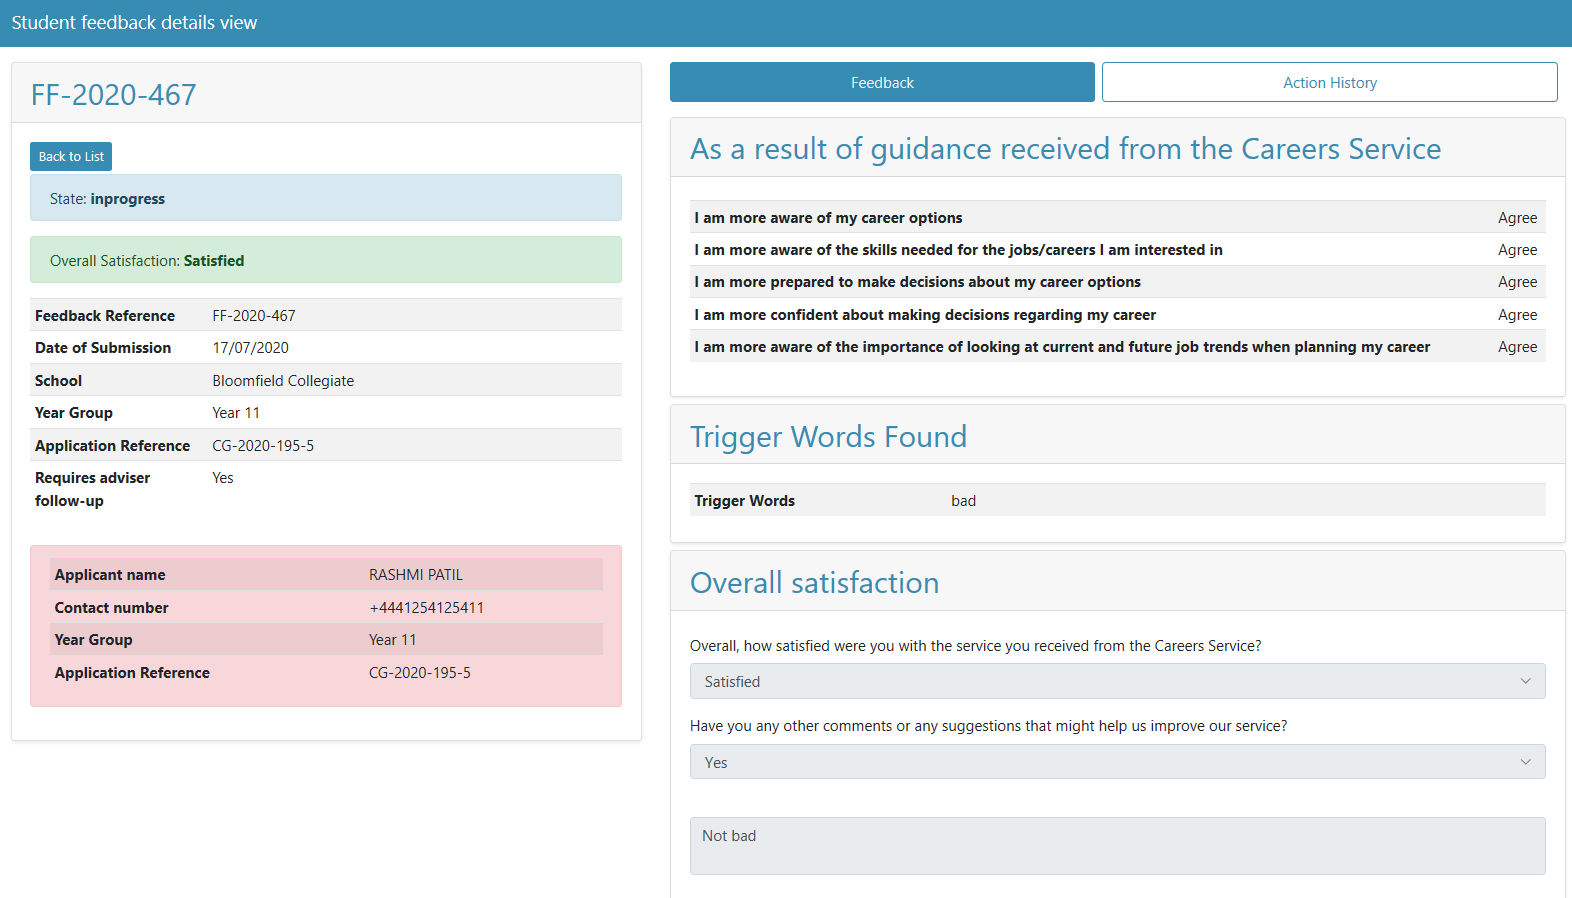
In this application, the system has identified the student as entering 'bad' into the text area for their comments or suggestions to improve the service.
Note
The system will check for trigger words in any free text area that the student has entered data.
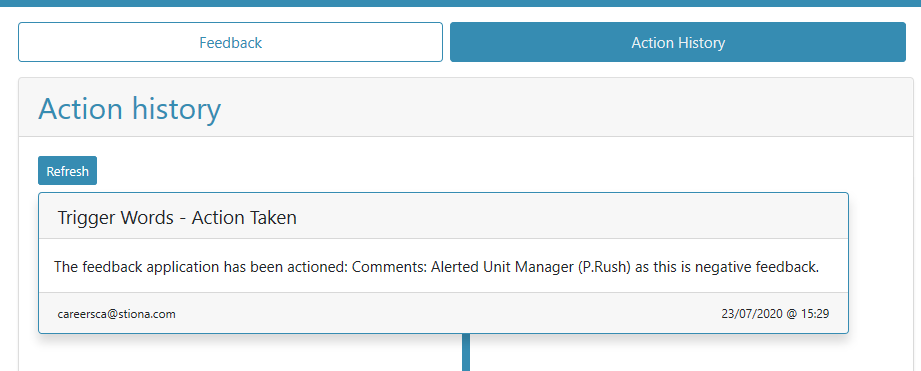
If the Adviser has actioned the trigger words, click the 'Action History' panel to view details. The action history will display the username, time and date the action was taken. When actioning the trigger words the Adviser has an optional comment box which can be used to detail their actions - the comment will also be available to read in this 'Trigger Words - Action Taken' entry.
Important
Advisers are able to process feedback forms containing trigger words in the same manner as feedback forms not containing trigger words. It is at the discretion of the adviser to 'Action' the trigger words on the service for traceability. Further appropriate action taken will be carried out offline.