Book a New Appointment
To make a booking, you will need to fill out the following details:
- the location
- the room
- the appointment type
- the time slot
- contact email and phone number
Step 1 - Select your location
From the left-hand navigation bar, click the Book A New Appointment menu item which will display a list of all the configured locations that you have access to.
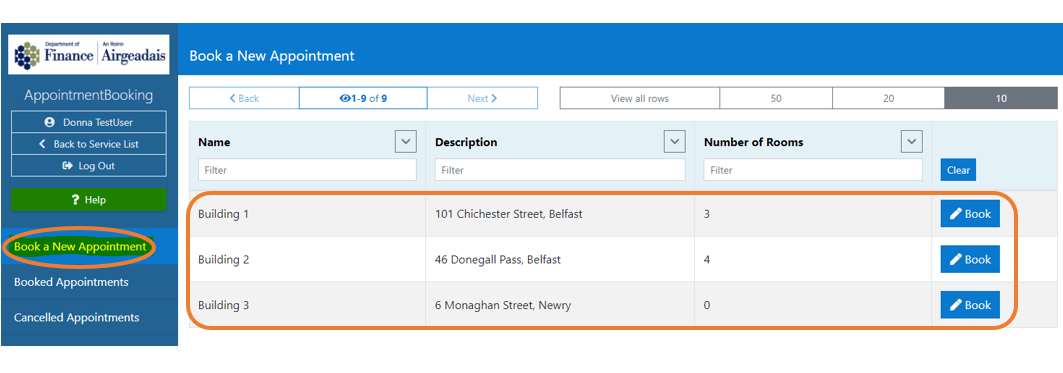
Clicking the Book button next to your preferred location will display the booking calendar for that location
Step 2 - configure your search
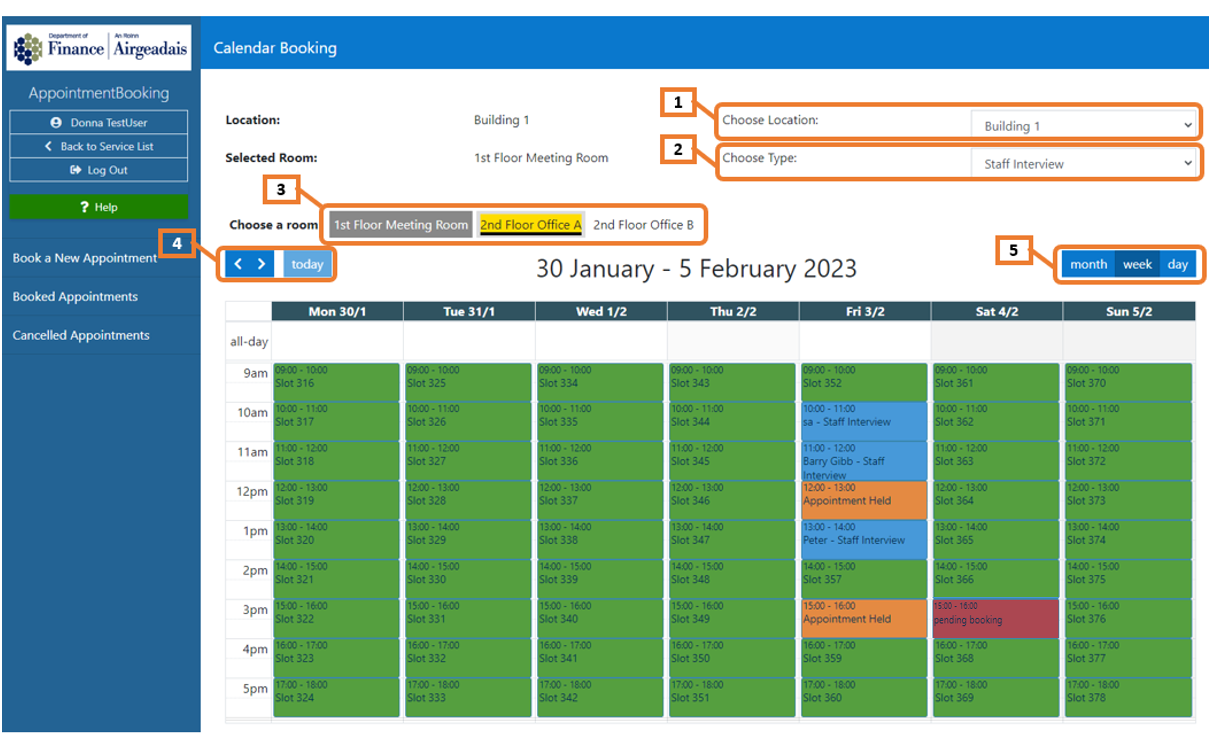
The calendar will display the available slots for your chosen location (defaulting the application type and room to the first configured entry). The slots are colour-coded to easily identify the available slots:
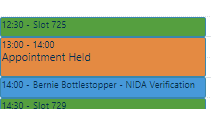
- Green: this slot is available for booking
- Blue: this slot has been booked and is not available
- Amber: this slot is being held and cannot be booked at this time, however, it may or may not become free later - note that an appointment slot can only be held by an Admin user
- Red: this slot is in the process of being booked by another user
- Grey: this slot is not available for booking
Changing the following options will update the calendar immediately:
- Choose Location: defaults to your selection in Step 1 - use the dropdown list to change to a different location.
- Choose Type: defaults to first configured type - use the dropdown list to select a different application type.
- Choose a room: defaults to the first configured room. All configured rooms for the location selected will be displayed; click the room you wish to book to see the availability displayed in the calendar.
The calendar defaults to the week view but you can change this using:
- arrow button:
- right arrow button will move you further into the future - depending on your view, this will move to the next day, week or month.
- left arrow button will move you backwards - depending on your view, this will move to the previous day, week or month.
- today button will orient you back to the current day, week or month.
- calendar view buttons:
- month button will display all the available slots for the current month
- week button will display all the available slots for the current week (default view)
- day button will display all the available slots for today only
Step 3 - book an appointment slot
To book an appointment, click on the time slot that you want
this will display the booking modal:
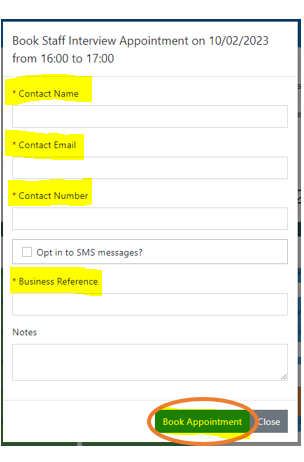
Enter the requested information:
- Contact Name (mandatory)
- Contact Email (mandatory)
- Contact Number (mandatory)
- Opt in to SMS messages? (optional)
- Unchecked - will not send any SMS messages
- Checked - will issue SMS notifications to the phone number you provided above
- Business Reference (mandatory)
- Notes (optional)
Click the Booking Appointment button to proceed.
Note
Note that users with the AppointmentBookingAdmin role will also be able to hold an appointment slot - see the Additional admin actions section below.
Step 4 - confirm booking
The modal will then display the confirmation email message that will be issued on booking. This allows you to review the details of your booking before completing.

Note
Please be aware that at this stage, you have the ability to add additional text to this confirmation email by typing into the yellow box.
- Clicking the Confirm Booking button will
book the appointment
display a confirmation message on the screen
display the slot in blue on the calendar
send the automated email message to the specified email address
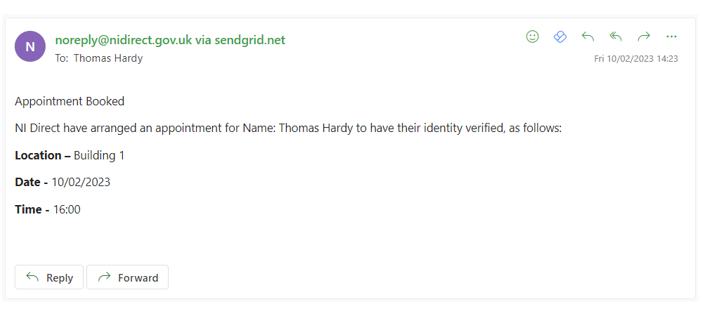
if you have checked the Opt in to SMS messages then a text will also be sent to the specified mobile phone number.

Additional Admin actions
Note
Users with the AppointmentBookingAdmin role have the following additional abilities within the Book a New Appointment flow.
Hold an appointment slot
In step 3 of the booking flow above, an additional Hold Slot button will be displayed on the modal:
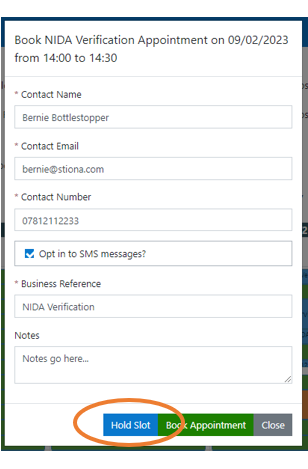
Once you have filled in the mandatory details, clicking the Hold Slot button will:
hold the slot so that no one else will be able to book it
the slot will be held forever or until an admin releases it
the slot will be displayed on the calendar in Amber
Release a held appointment slot
As an admin, you have the ability to release any held slots.
On the Booking calendar, click on a held appointment slot (displayed in amber)
this will open the following modal:
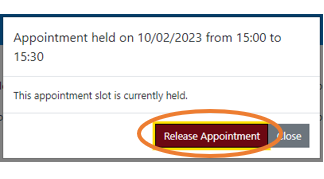
clicking the Release Appointment button will
- display a confirmation message on the screen
- turn the slot from amber to green on the calendar
- allow users to book this slot
Cancel a booked appointment
As an admin, you have the ability to cancel any booked appointments.
On the Booking calendar, click on a booked appointment slot (displayed in blue)
this will open its appointment details modal:
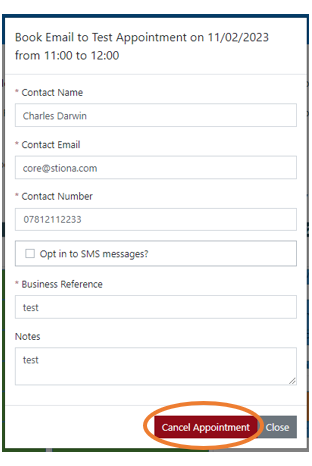
clicking the Cancel Appointment button will display a confirmation modal:
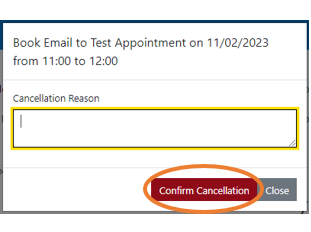
enter a Cancellation Reason (mandatory) and
click the Confirm Cancellation button which will
- display a confirmation message on the screen
- turn the slot from blue to green on the calendar
- allow users to book this slot
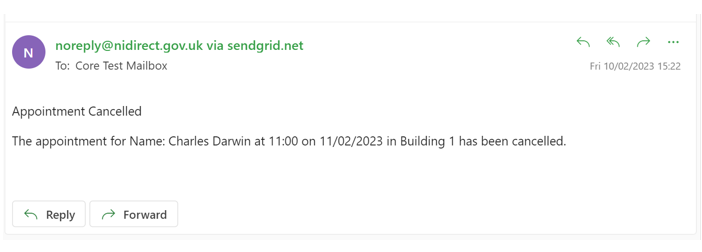
- send an automated Cancellation Notification to the email address specified in the appointment details
- if the Opt in to SMS messages option was enabled, then a cancellation text will also be sent to the mobile phone number specified in the appointment details.

Clear a pending appointment
As an admin, you have the ability to clear down any pending appointment slots.
On the Booking calendar, click on a pending appointment slot (displayed in red)
this will open the following modal:
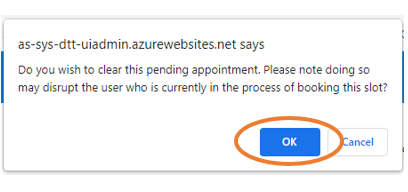
clicking the Ok button will
- display a confirmation message on the screen
- turn the slot from red to green on the calendar
- allow users to book this slot
- will disrupt the user who was booking the slot.