Book A Desk
To make a booking, you will need to fill out the following details:
- personal & contact information
- the building
- the floor (and optionally the zone)
- if this a single or multi-day booking and
- the time slot
The system will then return all available desks matching your criteria and allow you select the desk you would like to book.
To begin, click the Book A Desk menu item from the left-hand navigation bar.
Step 1 - Personal Information
The system first needs to know who the booking is for.
Personal Information guidance text is available at the beginning of the flow
The system will assume you are booking for yourself and default to the 'For Myself' option, however, if you are booking on behalf of someone else then you must select the 'On behalf of' option instead:
the option For Myself automatically populates your Forename, Surname and Email as the logged in user - you will only then need to fill in your Contact Number and Fire Warden Trained fields manually.
Note: any automated booking emails will be issued to the email address provided here.
the option On Behalf of Someone Else will display the Forename, Surname, Email, Contact Number and Fire Warden Trained fields - these will be empty and require you to fill them in manually.
Note: any automated booking emails will be issued to the email address provided here.
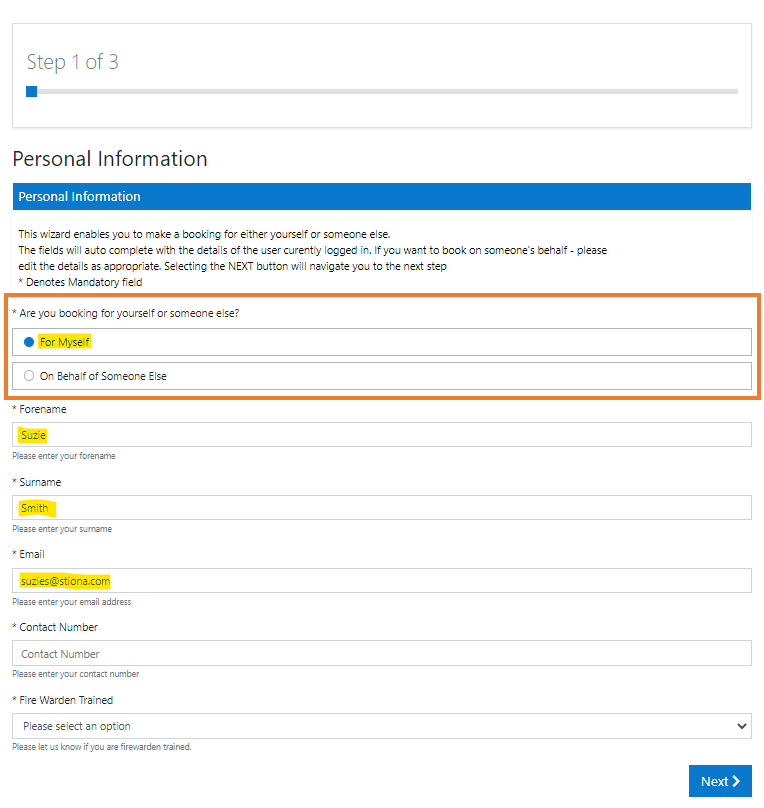
Click the Next > button to proceed.
Step 2 - Booking Information
The system then needs to know where and when the booking is for:
Booking Information guidance text is displayed at the beginning of the step and Help text is available on each of the components
- select the Building from the dropdown list which will display the rest of the fields
- select the Floor – different floors may have different availability/number of desks for example. Depending on how a floor is configured, extra details may be displayed:
- if a floor plan has been uploaded then a View button will be displayed for you to download it to your desktop
- if zones have been configured for this floor, then a list of zones will be available for you to select should you wish to search for desks within certain zones. If no zone is selected, then all desks that meet your requirements will be returned for that floor.
- select the Type of booking – you can decide if you would like to book these desks for one day or for multiple days:
- One Day Booking - enter a single date
- Multi Day Booking - enter a date range where Start Date is the first day these desks will be used and the Finish Date, is the last day they will be used.
- the Finish Date must be after the Start Date
- you will only be able to book desks for a maximum of 1 week at a time
- Repeat Booking - allows you to book the same day every week or every other week for up to 3 months
- select either Weekly Booking or Fortnightly Booking
- select the Repeat on Day which is the day of the week you wish to book every week or every other week for up to 3 months
- enter a Start Date and an End Date
- the Finish Date must be after the Start Date
- you will only be able to book desks for a maximum of 3 months at a time
- select a Booking Slot - there are 3 different time slots and the times configured for each slot is dependent on the building selected.
AM - this time slot is for the morning portion of the day. This varies from building to building, but could be set from 9:00 to 12:30 for example.
PM – this is the afternoon/evening portion of the day. Depending on the building this can last any time after the AM slot.
All Day – This slot allows you to book desks for the whole day within the building. This typically means that the desk is booked from the time they open until closing time.
- Be aware that you will not be able to book slots once the time has passed. In this scenario, the following message will be displayed instead of the booking slot options.

- Be aware that you will not be able to book slots once the time has passed. In this scenario, the following message will be displayed instead of the booking slot options.
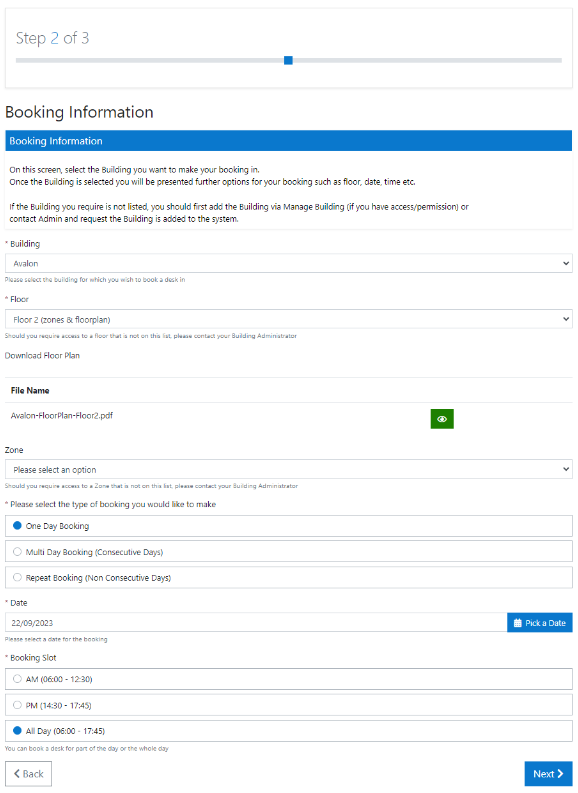
Click the Next > button to proceed.
Step 3 - Desk Selection
This page contains a list of all the available desks that match the search criteria entered in Step 2.
The list of available desks returned includes the desk name, building name, zone and dates. In this example, we did not specify a zone, so all available desks on that floor have been returned.
From the list, you can select the desk you wish to book by clicking its associated time slot button. Should you change your mind, clicking it a second time will deselect it, or just click a different desk and your previous selection will be released.
You are able to select 2 different desks for the AM and PM slots in the flow and these will be treated as 2 bookings. Clicking All Day will select the one desk to cover both slots.
Once selected, your choice will be bolded and the start and end times added to the display.
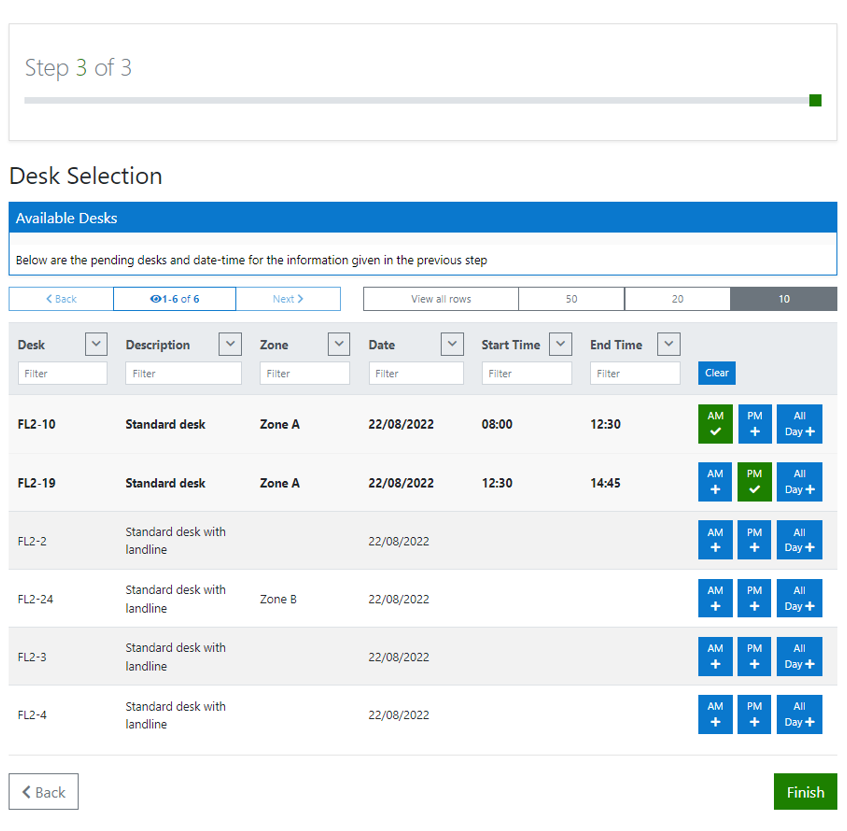
Click the Finish button to complete the booking.
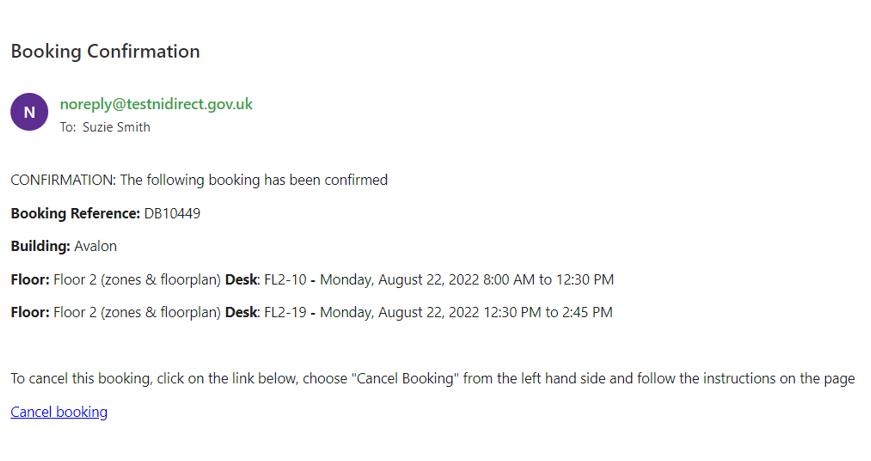
Confirmation
Once your booking has been successfully completed, the system will display a booking confirmation on the screen.
In this example, 1 desk was booked for the AM slot and a different desk for the PM slot on the same day, therefore 2 separate bookings have been made in the system as shown below:
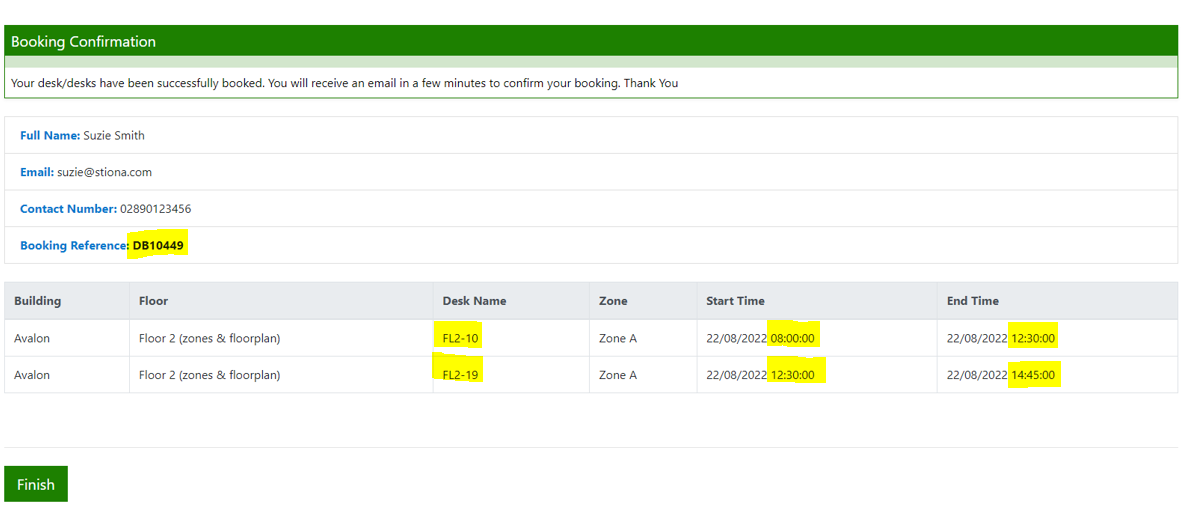
Click the Finish button to return to the start of the Book A Desk flow.
If the booking is for yourself, then you will also receive an automated confirmation email with the same information enclosed. If however, you booked on behalf of someone else, then they will recieve the automated notification.
Should you wish to cancel your booking, follow the Cancel Booking link at the bottom of the email.